

 I’m not the greatest follower of recipes. I change ingredients because I don’t like them or I can’t find them. But sometimes you just need to follow the directions. (Gulp.) This is the first of what (I think) will be a semi-regular feature where I actually follow all the instructions, as best I can, and report to you the challenges and helpful tips I discover during the process. My intent is that these recipes always come from actual cookbooks (because I love books), rather than magazines or blogs — though this may change — and that I’m also able to give you an idea as to whether the particular book might be a good investment for you.
(A reminder: as always, as long as the book is still in print, I won’t be copying the recipe here for you. See here for why. These posts are meant to be companions to the original recipe, not a substitute. For this reason, too, it’s best if you have a copy of the recipe to refer to while reading this post, though it’s certainly not necessary if all you want to do is drool over food photos. Which is most certainly welcome.)
. ISBN: 978-0307720498.") Chef Christina Tosi blew into town briefly a couple weeks ago, and Shake got the chance to meet with her. “You’re going to meet CHRISTINA TOSI?!? Oooooh, will you ask her to sign my book??” Die-hard sugar freaks will understand my excitement and recognize Tosi as the famed pastry chef of David Chang’s Momofuku empire — her “Crack Pie” is legendary — who creates the most insane desserts, served up at Momofuku Milk Bar. (“My book” here referring to Tosi’s cookbook, Momofuku Milk Bar.)
Chef Christina Tosi blew into town briefly a couple weeks ago, and Shake got the chance to meet with her. “You’re going to meet CHRISTINA TOSI?!? Oooooh, will you ask her to sign my book??” Die-hard sugar freaks will understand my excitement and recognize Tosi as the famed pastry chef of David Chang’s Momofuku empire — her “Crack Pie” is legendary — who creates the most insane desserts, served up at Momofuku Milk Bar. (“My book” here referring to Tosi’s cookbook, Momofuku Milk Bar.)
Momofuku Milk Bar totally seems like my kind of place, because it’s a bakery (with five locations) that doesn’t open until 9AM and stays open ‘til late at night. I find bakeries useless in the morning (since I’m generally not ambulatory until 9AM anyway), and I always want a good dessert, inevitably late at night when restaurants are closing and Zippy’s just has the crappy dregs of the bakery case left.
 Anyway, Shake did ask Chef Christina to sign my book, and he said she was super happy to do it. She wrote the sweetest inscription, suggested I make her favorite cake in the book, the Chocolate Chip Layer Cake, and told Shake I should email her if I had any questions about how to make it and to tell her how it went. Ack! Pressure!
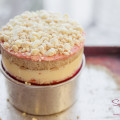
The Momofuku Milk Bar Chocolate Chip Layer Cake is an outrageous concoction that involves layers of chocolate chip cake, chocolate cookie crumbs, passion fruit curd and coffee frosting. Like the other cakes in the book, it’s left unfrosted on the sides so you — and anyone and everyone to whom you want to show off your skills — can admire the layers. Before you devour it.
Honestly, when I first cracked open Momofuku Milk Bar, the recipes daunted me. A majority of them involve either special ingredients that most normal home cooks don’t have on hand (glucose, clear vanilla extract, sheets of acetate) and/or multiple sub-recipes to make a single finished dessert (make cookie crumbs, cake, filling and frosting, each a separate recipe). I felt a little guilty, having spent many work hours cajoling people into buying chefs’ cookbooks, saying, “Well, yes, Chef’s dishes are a little involved, but each sub-recipe is really very manageable on its own. It’s still something you could accomplish at home.” Man, that karma. Big on biting you in the ass.
It’s nice to say, though: I’m not wrong. With the exception of procuring the products you don’t have, Tosi’s recipes are do-able at home. You just need patience (not something I’m that good at, so if I can do it, you can) and to be disciplined about organizing your process. That’s something else that I tend to overlook in the kitchen — I always think “Oh, it’ll be so easy to grab the XXXXXX out of the cabinet when I need it.” No, dummy, just take it out, and all your measuring spoons and bowls, and lay them out.
Before You Start (Regarding Ingredients)
I’ve mentioned already that the recipes in Momofuku Milk Bar require ingredients that aren’t exactly common in everyday home kitchens. The assortment of things I didn’t have for this recipe (and you probably don’t either):

 with buttermilk and vanilla extract. © 2013 Sugar + Shake") Grapeseed oil — Not hard to find, I just don’t happen to have it. It’s easily found at grocery stores. I bought mine at Whole Foods because I was there. If you’re planning on baking from this book with any frequency, you might as well get a regular size bottle (not one of those tiny 4 oz. bottles) because you’ll use it. It’s a very pretty shade of bright green. I also noticed it’s not as viscous as other oils. Wikipedia says it’s good for baking, frying and salad dressings (because of its high smoke point and light taste), as well as for slathering on your face. You know, in case you buy the bigger bottle and don’t use it all for cooking.
Grapeseed oil — Not hard to find, I just don’t happen to have it. It’s easily found at grocery stores. I bought mine at Whole Foods because I was there. If you’re planning on baking from this book with any frequency, you might as well get a regular size bottle (not one of those tiny 4 oz. bottles) because you’ll use it. It’s a very pretty shade of bright green. I also noticed it’s not as viscous as other oils. Wikipedia says it’s good for baking, frying and salad dressings (because of its high smoke point and light taste), as well as for slathering on your face. You know, in case you buy the bigger bottle and don’t use it all for cooking.
Instant Coffee — Like the grapeseed oil, it’s not exactly hard to find, it’s just not something that we keep in the house. Tosi says that the Greeks make an insanely good frappé with the Nescafé brand, so that’s what I bought. Of course, it was only available in this enormé bottle. If you are being thrifty, I highly suggest buying those small, single-serving travel packets. I don’t know if Nescafé makes them, but Folgers does. Don’t get the flavored (Starbucks) kind; you want intense coffee flavor. You only need ¾ teaspoon for this recipe, and it’s one of only two recipes in the book that call for the powder. I would have returned the bottle and done this, but I was lazy, and then it was time to make cake, so I just kept the damn thing.
Cake Flour — OK, now you’re probably thinking that I’m shopping challenged, as these ingredients so far aren’t exactly impossible to get. However, if you start the shopping trip at Whole Foods, you will be disappointed when you look for cake flour. (They only have whole wheat, which is not gonna do it. I’m not sure; I think Christina Tosi might die a little bit inside if you used it.) I went to a second grocery store, and didn’t find it there either. (Weirdly, a week later, we were at a different store of the same chain, and they had it.) If, like me, you never bake cakes, you probably don’t have cake flour either, and it’s not a good idea to try to substitute for it. (Although if you Google it, there are ratios for combining regular flour and cornstarch to make cake flour. Seems like more trouble, if you ask me.)
Passion Fruit Purée —It is a great irony that in the middle of Hawai‘i, it’s really difficult to find passion fruit purée (passion fruit is liliko‘i) and we end up having to buy this French imported stuff. It’s also annoying because it comes in 2.2 lb. containers, and you don’t need nearly that much, yet the box admonishes, “Do not re-freeze.” I’m totally re-freezing it anyway. I first tried R. Field out in Kailua, because I thought I remembered them stocking passion fruit purée. My memory was sort-of right. They did, indeed, have the container I remembered. Unfortunately, it was concentrate, not purée. “What’s the difference? Aren’t they kinda the same? The brand says ‘Perfect Purée.’” And thus went the discussion between me, Shake and the clerk. Seeing as how it was $22, I wasn’t going to chance it. Thanks to my Twitter friends, @onokinegrindz and @nctrnlbst, I learned that I could use the concentrate in place of purée, but I’d have to adjust the amount, but also that purée could be had at Y. Hata, the local restaurant supply place (the general public can shop there too). Note to self: Never, ever, ever, EVER go to Y. Hata at 9AM on a weekday. (I spent 20 minutes driving down the highway and another 15 sitting in the parking lot where people were double- and triple-parked in the “No Parking” areas.)
Acetate — This clear, flexible film (it’s basically like those transparency sheets teachers used to use) is used to create a taller frame to build the cake in. (This baby goes up!) If you’ve ever gone to a fancy bakery, sometimes you’ll have to peel off a clear wrap from the layered desserts before you eat them — same thing. I hit two stores before I found some (I knew the first place was kind of a long shot, but it was on the way back from the restaurant supply place anyway.) Go to an art supply place rather than a craft place. I found it at Hawaiian Graphics, where the staff was super nice to me, even if the guy gave me a weird look when my answer to “We have different kinds; what do you need it for?” was “Making cakes.” Also, what they have isn’t acetate, per se. It’s called “Dura-Lar” (a brand name) and it’s an acetate/mylar blend. For this purpose, totally the same thing. I can’t remember which thickness I got, but the sheets are about 18” x 24” and run $2.25 each. (It also comes in rolls, but I felt that was excessive…) )(Update: Found my receipt from the store…thickness was .004mm, and the sheets are actually 20″ x 25″.)
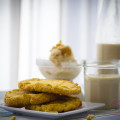
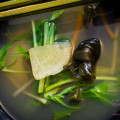
Buttermilk — This absolutely isn’t a hard-to-get ingredient, but I’m listing it here at the end because, as you may notice, it’s not in the photo. This is one of the few items on the ingredient list that you really can substitute for with no trouble. The chocolate chip cake portion of the recipe requires a half cup of buttermilk. No one sells buttermilk in tiny pint containers, and unless you have really ambitious plans to make buttermilk pancakes and buttermilk-battered fried chicken or pork chops, you’re never going to use it all. Dairy is really expensive here, so I never buy this unless we need a lot or I really am being strategic about using the rest of it. Make your own by combining one tablespoon of vinegar (or lemon juice) and adding milk to the 1 cup mark. Let sit for five minutes and measure out what you need.
(This is not what making homemade buttermilk looks like…this is a mix of buttermilk, vanilla extract and grapeseed oil.)
 with buttermilk and vanilla extract. © 2013 Sugar + Shake")
The Process
The Chocolate Chip Layer Cake involves four sub-recipes: the Chocolate Chip Cake itself; Chocolate Cookie Crumbs (aka The Crumb) and Passion Fruit Curd for layering; and Coffee Frosting.
Here’s the order in which I suggest making the components:
- Cookie Crumbs
- Cake
- Curd
- Frosting
This way, you can leave the oven on after you’re done with the crumbs (you just have to raise the temp for the cake). By the time you’re done making the cake batter and have it in the oven, the crumbs are cool and ready to be put away, so your cooling rack is ready for the cake. I’m normally impatient, and would try to make the curd while the cake is baking, but decided this would be a bad idea. The cake only takes about 30 minutes to bake, and the curd needs careful attention. Have some patience (soooooo hard for me!) and wait ‘til the cake is done baking before you start the curd. It would really suck to ruin one (or both) because you were too busy paying attention to the other.
At this point in the game, after making the first three items, I stopped and Shake and I went for a dinner run. (I started the entire process at around 4PM and, including the dinner run, had the cake completely assembled by 11PM. I honestly thought this would take me two or three days to do, so I was extremely pleased with how quickly it all went.) After dinner, I cut out the cake layers, made the frosting and assembled the whole thing.
The alternative to my timeline laid out above would be to do the curd first, because it needs to chill in the fridge before you can assemble the cake. The cake itself needs to be completed cooled before assembly, too, so I’m really an advocate of the go-to-dinner-in-the-middle strategy because then you won’t waste any time waiting around for chilling to happen.
Making “The Crumb” (as it’s called at Momofuku) was a pretty straight forward process and presented no challenges. Tosi asks for Valrhona cocoa powder; I happened to have exactly the amount of powder called for…but Hershey’s. I used that. The crumb tasted fine. But I am going to go and buy some high quality cocoa for next time. You only need half of the crumb recipe for the cake. Shake wants to eat the rest with a spoon like cookie cereal. I’ll probably let him.


Likewise, the cake is a simple recipe. It’s made in a quarter sheet pan, which I didn’t own before now, and now can’t imagine why I didn’t. It’s an awesome size. Be sure to spray a LOT of cooking spray on the bottom and UP THE SIDES of the pan before laying down the parchment. I had a little trouble getting the cake OUT of the pan after baking, but only sacrificed a couple corners. Phew. The cake calls for ¾ cup (150 grams) of mini chocolate chips. Handy fact: a standard bag of mini chips is 12 oz. (340 grams); half a bag is just over what the recipe calls for, but I figured that if there’s anything Christina Tosi would object to, an extra handful or two of chocolate chips would not be it.


 So here’s the deal with the curd: the recipe calls for a sheet of gelatin, but all of Tosi’s recipes include the equivalent amount of powdered gelatin, so this is one of those specialty ingredients you absolutely don’t have to feel compelled to procure. However, make sure you understand the gelatin blooming process thoroughly before starting. I didn’t, and it’s just sheer luck I didn’t screw this up.
I actually messed up my first attempt at blooming the gelatin because I used too much water, and the gelatin was very diffused over the water. For my second attempt, I thought it would be smarter to use cold passion fruit purée instead of water, and I reduced the amount of liquid to around a tablespoon. (The instructions on blooming gelatin indicated that I would need to “squeeze out any excess liquid” and I couldn’t imagine being able to gather up, much less squeeze, the tiny amount of gelatin the recipe uses, so I thought that if I used the purée, it wouldn’t matter if I had some extra liquid. I still don’t think this is a bad tactic, but the proper amount of liquid should be around 2 tablespoons, which wasn’t mentioned in the notes.) I ended up with a soft orange blob that had sucked up all the liquid in the bowl. I don’t think it’s supposed to be like that, but since it was very mushy, I tossed it in anyway. What you’re actually supposed to do is add some hot purée (or whatever liquid goes into your recipe) to the gelatin to make it more liquid-y and THEN add it to the rest of your ingredients. Since the gelatin was being added to a mixture of hot purée, eggs and other ingredients, I got lucky — it just melted in. I can’t imagine what would have happened if the mix had been cold, though.
The curd is delicious, and if you like that sort of thing, I’d suggest making a double recipe because the one recipe doesn’t leave any leftovers. If you make double, you’ll have some for toast or crumpets!
I cut out the cake layers and set the bottom layer into the pan before making the frosting. The recipe calls for you to use the cake pan to stamp out the layer rounds, but the pan I bought happens to have a rolled edge (which I actually like because I’m the kind of klutzy idiot who would probably manage to slice my hand open on an unfinished edge). This means it doesn’t make a very good cutter. Instead, I used the pan’s bottom insert as a guide and cut around it with a knife. It makes rounds EXACTLY the size you need.

The reason I cut out the cake before making the frosting is because Tosi’s notes on the frosting say to use it immediately (in other words, don’t make it ahead and set it aside on the counter or in the fridge; it’ll separate or get weird and hard and will be a real bitch to fix). Given that it can be really hot in our house, I took her very literally and did EVERYTHING involved with this cake before making the frosting, fearing that it could separate on me before I got it on the cake. Her notes (I love that she includes detailed instructions that tell you what the recipe should look like at a given stage — “fluffy and pale yellow,” “twice the size of your original mixture”) also point out that the frosting will initially look like it won’t mix together. This is normal. “You are essentially forcing liquid into fat, so be patient,” she says. (There’s a similar note in the instructions for making the cake…do you sense a theme here?) She says to keep the mixer on low; I found that I needed to boost it up a little higher than low (up to the 4 on my Kitchen Aid). Also, once you’ve added all the coffee milk into the frosting, you’ll want to scrape down the sides and get it all into one clump in the center. Suddenly, little pools of liquid will start seeping out — it’s all the liquid that was clinging to the side of the bowl. Hit the frosting again with the mixer for a couple minutes to ensure all the liquid has gone into the butter.

The instructions say to use the back of a spoon to spread the curd and frosting, but you’ll probably have an easier time with an offset spatula, due to the high sides created by the acetate frame. The cookie crumbs will stick to the frosting relentlessly, and you just need to accept that 1) you will not have a pretty layer of frosting that covers up the crumb layer and 2) you might not have a clean, even spread of frosting across the entire layer. You’ll definitely need one hand to spread the frosting and the other to kind of anchor down the crumbs and frosting that you’re working on. I found it easiest (and this goes for the curd, too) if I plopped little dollops of frosting — four or five — along the outer edge of the layer and one in the center and tried to spread from the edge to the center. (It’s really hard to try to move your hand from center outward because of the acetate. Also, if you have really big hands, I don’t know what to tell you — this part is going to suck. My hand barely fit inside the acetate ring and I have pretty small paws.)


 I noticed when I looked at other blogs online, a lot of people mentioned that they needed to make a double batch of frosting in order to have enough for the two inner layers and the top. It’s possible to do it with the one batch (I did), but you have to go gently on the inner layers. I also noticed that in the step-by-step photos in the book, you can see that the frosting doesn’t get spread entirely evenly across the inner layers — there are some spots that look like they barely have frosting, and others where it’s piled thick. I think the point is that this cake isn’t supposed to be PERFECT. It’s supposed to be homey. There are three layers of frosting on this cake, so if you don’t get it all over inside, I don’t think anyone will feel shorted. But, if you love frosting, hey, go ahead!
Once you’re done with the spreading and stacking, the cake needs to be frozen overnight (12 hours, according to the recipe). In our house, this involved cleaning out the freezer. And once again giving thanks to our landlord who allowed us to pick out our new refrigerator. (I never would have been able to slide this cake into the old freezer.) At about 7 or 8 inches high, the cake barely fits in the top bin of the freezer.
 © 2013 Sugar + Shake")
The recipe doesn’t say to wrap it up before freezing, but I thought it would be a good idea, seeing as how I don’t have a big ol’ walk in freezer that holds nothing but desserts, as I assume exists at Momofuku Milk Bar. I was afraid of freezer burn, getting frosting on the inside of my freezer and the cake absorbing weird smells. So I wrapped it up in plastic wrap and foil to keep it safe.
The Results
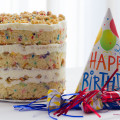
The finished cake is really quite stunning. I sent a photo to our friend/neighbor Melisssa, who posted it on Instagram; I was overwhelmed and so flattered by all the “like”s and compliments from her followers, particularly from the professional baker who said she “recognized what it was before I read the caption” identifying it as the Momofuku cake. (Thanks, everyone! I appreciate all your kind words!)

Not only does it look good, but it tastes good too! I really thought that given all the butter and sugar (over 4 sticks of butter and nearly 3 cups of various sugars, total) it would be much richer and sweeter. The acid from the passion fruit really tames down the sweetness, and had the frosting been chocolate (as would be the more obvious, less inventive, pairing) instead of coffee, I think it would fall over the sugar cliff. Speaking of passion fruit and coffee, I was a little dubious that these two flavors could work together. But Christina Tosi is a famous, genius pastry chef, and I am not, and she has sold hundreds and probably thousands of these cakes, so I figured that even if it sounded weird, it must work. It does. My only problem is figuring out how to eat it so that I get all the layers in each bite.

We have been eating it straight out of the freezer, although the recipe says to defrost it. I really like it frozen, since it reminds me of ice cream cake, which I adore. Melissa also said she liked it frozen because she can slice off thinner pieces in order to stack them up so she can get all the layers in one manageable bite.

The Verdict
Should I try this recipe? If you have patience and a full day to work on this project, I highly recommend this recipe. The sense of accomplishment is tremendous, and if you really want to impress dinner guests or be the star of your next potluck gathering, this is the way to do it.

You don’t have to be a pastry chef to pull it off, but you probably need some baking experience and the willingness to go out and spend some money on equipment and ingredients you don’t already have (or a kind friend who will let you borrow the requisite sheet and cake pans). If you only bake from box mixes, this is likely a bit of a stretch for you, just because it does have so many steps. But this might be that reason you need to try from-scratch baking!
Difficulty: 4 out of 5 (because of the tedious ingredients hunt and multiple sub-recipes; the recipes themselves are not terribly difficult)
Should I buy the book? If this recipe hasn’t scared you off, then sure. The other recipes in the book are similar — lots of layer cakes, lots of recipes that use things like cookie crumbs to enhance flavor and texture. It probably won’t be your every weekend baking book, but for special occasions, I can see this getting regular use. But if the idea of having to make two different things just to make a batch of cookies does not appeal to you, no, this isn’t the book for you. Also, if you hate buying specialty ingredients, you won’t like this one. Oh, and if you don’t have a lot of room in your fridge and freezer, you won’t like it either — as with most dessert books by chefs, you’re frequently required to chill or freeze things as large as a baking sheet. This has always been a challenge for me, until the new fridge, so I always avoided those kinds of recipes.
Momofuku Milk Bar
by Christina Tosi, foreword by David Chang
Retail List Price: $35.00
256 pages, hardcover
Clarkson Potter (October 2011)
ISBN: 978-0307720498
There's Always More to Eat and Drink:
 (Sort Of) Cooking From the Book: Strawberry-Lemon Layer Cake (Christina Tosi recipe in Saveur)
 Cooking From the Book: Birthday Layer Cake (Momofuku Milk Bar)
 Cooking From the Book: Cereal Milk Ice Cream and Corn Cookies (Momofuku Milk Bar)
 Cooking From the Book: Cake Truffles (Momofuku Milk Bar)
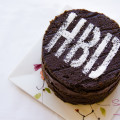 Happy Bourbon Day (Cake)!

Melissa Chang
January 31, 2013 9:08 amSo freakin good! All I know is, you should call it Gangsta Cake because just running through the lobby to deliver my half slice to the Sake Shop, I thought I was gonna get mugged by Cake Zombie, Dennis Noah!
sugar
January 31, 2013 10:33 amCake Zombie…hahaha!
Ed
January 31, 2013 1:21 pmYou can refreeze the pure, but you have to make sure that it is air tight so that ice crystals don’t form. What I do at home is I freeze the puree in ice cube trays and them store them in a zip-lock bag. Here’s is the important part. you have to remove all or as much of the air, which causes ice crystals to form, from the bag as possible.
A vacuum packing machine would be ideal, but if you don’t have access to one, here is what you can do. Hold the the zipper part of the bag with both hands. Submerge the bag into a bowl of water until the air has been pushed out by the weight of the water. Seal the bag and you’re done.
This is a handy way of storing any liquid, especially stocks. I almost never use a whole can of chicken broth at home, but throwing a few cubes into your dish while cooking is convenient and efficient.
sugar
January 31, 2013 1:27 pmThanks, Ed! This is soooo helpful! Love the water technique for removing air, since I’m not allowed to buy any more kitchen gadgets because I’ve started to store them on the living room floor.
Ed
January 31, 2013 1:44 pmI have one of these at home. It’s small and doesn’t take up much space. You have to buy special zip-lock bags, but they are durable enough that you can use them multiple times.
http://tgt.com/WEkRYb
sugar
January 31, 2013 4:34 pmOooooooh! Handy dandy! My MIL had one of those heat seal ones (same brand) but it didn’t always work. and it’s bulky. This looks convenient.
aya
January 31, 2013 11:06 pmGAWD, reading your posts makes me want to try your cake!! do you have any left??? 😉
you did awesome! xoxo
sugar
February 1, 2013 12:19 amThank you!!
Urp. Only a couple bites left. 😉 Sorry! (Dessert does not last long around me!)
esther
March 8, 2013 8:14 amholy cow. This looks SO amazing! I think I might have to try this out myself.
question: one sheet of cake = 3 circles?
sugar
March 8, 2013 3:21 pmHi Esther! Thanks for reading! Yes, one quarter sheet pan makes two nice circles & one “janky” (as Chef Christina says) layer — basically two almost-half circles & some random bits to fill in. No one will ever know it’s not a nice, full circle! Good luck!
Nita
July 10, 2021 9:09 amI just popped this cake into the freezer for a family get together. Too many people are expected for the 6″ cake so as suggested by Tosi, I doubled it and baked in 1/2 sheet pan. For a 9in cake.
I didn’t double check the math…spoiler alert… it doesn’t work. 1/2 sheet pan would give an 8in round cake but not a 9in. I discovered I don’t own anything 8in except a skillet. Luckily, I have an 8in square pan with removable bottom and that was a PERFECT fit for 1/2 sheet pan.
So many people complained about the frosting, I almost skipped it. They were wrong! I had zero problems, BUT like you, I turned my mixer up a bit. Also, I didn’t do a steady stream like making mayo, but treated it more like adding eggs one at time. Turned mixer down, added about 1/4 in a stream then turned mixer up to incorporate, down for next 1/4 (no, I didn’t measure… Just added “some”). Also, I already own Starbucks “micronized” instant coffee packets (office has terrible coffee). Since I was doubling the entire recipe, (3g coffee) and the packet was 3.3g, I used it all. And since I didn’t want to buy whole milk, I used 1/2 heavy cream, 1/2 water. I don’t generally keep milk in the house, never whole milk and I already bought the buttermilk so it seems like enough fridge space was already dedicated to this venture. This is as close as I ever come to following a recipe, every other ingredient was exact and precisely weighed.
Tosi gives the directions for gelatin power in the beginning when she reviews ingredients which I followed. Love the idea of using the puree. Will probably use that when I make the rest of my Goya puree into curd, bc that stuff is so delicious, I briefly considered leaving it off the cake so I can keep it for myself! Do wish I had taking that out of the refrigerator before I cut the cake and made the frosting so it would be a little warmer and spread a little easier.
I’m not convinced my crumbs are as crispy as they should be also they seem a little too small to use on top like she does. But since decorations will be later, I’ll consider it then.
I hope my layers look as beautiful as yours, but I’m doubtful. I’m not a baker, but somehow got stuck with dessert for this get together. Still, this cake IS do-able. Tosi does a great job of breaking it all down into parts making it attainable.
sugar
July 10, 2021 9:40 amGood job! I totally agree; it’s complicated but very do-able with her directions! I’ve made different ones of these layer cakes in sizes I didn’t have pans for, doing it semi-freeform by using a template for the round, but just stacking without a container to build in. They don’t come out as tight and with the clean frosting edge, but it worked. If I had thought about it more, I would have cut acetate strips to serve as a makeshift container. I’ve seen photos where the crumbs are all kinds of sizes, some big and summer small, so I don’t think there’s a “right” size!