

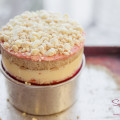
 This is not the sort of thing that normally comes out of my kitchen. For one thing, it’s much more fantastically decorated than anything I usually make.* For another, not only is it not edible, it’s made of the last thing you’d ever expect to find in the Sugar + Shake abode: diapers.
Why were there diapers in my house? Because I have an adorable new nephew who is very, very cute despite looking exactly like my brother. (I’m still wrapping my head around that. It’s a little unsettling.)
About halfway through the pregnancy, my sister-in-law’s mom started sending her baby clothes. Lots of baby clothes. In all kinds of sizes. I mean, this kid is set ’til he starts pre-school! Obviously, gifting more baby clothes was pretty unnecessary, so I started thinking about other options. I decided diapers were the way to go since I figured it was improbable that parents could have too many diapers. (This was a suspected fact that has now been confirmed by the presence of an infant in my parents’ house. Babies blow through these things like nobody’s business. Well, I guess it’s all their business and therein lies the problem.)
Of course, it’s not in me to just wrap up a bunch of boxes of diapers, so I decided to make a pretty cake out of them. I’d seen one of these once, but it was done in a different style—instead of the overlapping layers, each diaper was individually rolled. I didn’t care for that look, so I was dead-set on figuring out how to do the layered style.
I thought this would be a much harder process, but it turns out you can knock these things out in about half an hour, depending on how fancy you want to get with the decoratin’. Because of my fondness for things that look way harder to make than they really are, plus the realization that what new parents need most, in order, is money, sleep and diapers, I’ve decided that this is now my go-to baby gift. In fact, I made a second, smaller one last week for a friend who recently welcomed a baby daughter.


By the by, I just discovered The Honest Company diapers and they are ridiculously cute. I didn’t know they existed when I made the cake for my nephew, so poor thing has had his butt in these boring striped diapers for a while. Oh well. Maybe I’ll make him a training pants cake for his first birthday. I found the cherry patterned diapers for my friend’s baby at Target and they definitely make the finished product way cuter.

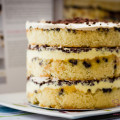
For the four-tier cake I made for my SIL’s shower, I used three sizes of diapers: Newborn (top layer; 11 diapers), Size 1 (middle layers; 57 diapers total) and Size 2 (bottom layer; 46 diapers). You can pack them in tighter and/or make the layer diameters smaller or bigger to suit the quantity of diapers you’ve got. If you have extras, no new mom will turn them down; just pack them in a gift bag or box. Or, be like me and stick ‘em back in the original box and say, “Here you go!” (What? I expended all my creative energies and wrapping enthusiasm on the cake!) I had about a third of the original amount of each size leftover.
You don’t have to use multiple sizes. The two-layer cake I did for my friend used a single pack of Size 3’s. (It was a belated gift, so I wanted to ensure the diapers would still be useful.) The smaller the layer diameter, though, the harder it is to pack larger diapers in. In the four-tier cake, the top layer is about six inches and the bottom layer about 14 inches; in contrast, the top layer on the two-tier is about eight inches and the bottom layer about 10 inches. FYI, If you go with a single size, you’ll spend less money. Because I bought three different sizes, it cost about two or three times as much as it would have if I had bought a super-jumbo pack of a single size. On the other hand, my brother and SIL got twice as many diapers out of it, and in multiple sizes.
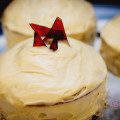
Oh, and in addition to making a diaper cake for the shower, I made some cupcakes.

These were box mix cupcakes dressed up fancy with Momofuku Milk Bar Birthday Cake frosting and Cookie Crunchies. The whole thing was crazy meta: I used a box mix to make a version of a cake that was made from scratch to imitate box mix. They were a hit at the party. One out-of-town guest raved about them so much, insisting they were better than the fancy bakery back home, I didn’t have the heart to tell her that half the cupcake was from a box and the other half was meant to taste like boxed cake.
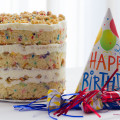
Back to the diapers…the other thing this cake is good for is a party game. Since this was a co-ed family party with my dad, uncles and some out-of-town guests, my mom and I decided the usual baby shower games were not going to be popular. Instead, we just did a simple “Guess How Many?” game using the cake. We set out a sign with some facts about the cake construction and let everyone submit a guess. One of my uncles guessed within a few diapers of the actual total!
Diaper Duty Cake
If working with multiple diaper sizes, the largest size should go into your largest layer. Once removed from the package, it may or may not be easy to tell which size is which, so be sure to remember what sizes went into each layer so new parents aren’t slapping the wrong size diaper on their baby’s bottom.
- Diapers (approximately 30—I used one pack of The Honest Company Size 3—for a two-tier cake; approximately 100 to 125, depending on size(s) used, for a four-tier cake)
- Ribbon and decorative elements (flowers, bows, etc.); ribbons with wire edging are particularly useful
- Double-sided tape
- Miscellaneous baby products (washcloths, diaper cream, pacifiers, wipes, etc.)
- Cake board (10” board for the two-tier; 14” for the four tier)
- Rubber bands, various sizes
- Cake pans (springform or the type with the push-up bottom are best) in multiple sizes
- Tulle netting; wooden or plastic dowel/pipe or empty paper towel/gift wrap roll
Building the Cake:
The process for each layer is the same: Start by layering five or six diapers like scales or roof tiles—position the end of each about one to three inches back from the leading edge of the previous. Turn the diapers on edge and line the inside of a cake pan with your stack; continue laying in staggered layers of diaper, spiraling in concentrically. Once you’ve made a complete circuit, take a look to see if you need to adjust any individual diapers so they’re all evenly spaced. You can be less persnickety as you spiral inward. As you can obviously see, this tier came out a bit off-center; no matter since it was a middle layer, so no one would be seeing it from the top down.

When you get to the point where you’re having difficulty adding in diapers, roll a diaper (you may need more than one) into a column and insert it into the center. (Or the not-center, if you end up with a slightly wonky layer like the one above.)
Use a rubber band to secure the diapers together. You want a band that fits lightly around the tier so that you don’t pinch it inward in the middle, but not too loose, or the middle of your tier could fall out. If you are building a bigger layer, I recommend starting with a pan smaller than you want your final tier, secure it with a rubber band and then continue layering outward (rather than inward, as previously). Secure again with rubber bands.

Using a springform pan or one that allows you to push the completed tier up and out makes it easier to get the rubber band around the top of the tier and then scoot it down to the center line once the sides of the pan are out of the way.
 Repeat until you have the desired number of tiers. Every two tiers is about a foot in height, so I wouldn’t go higher than five or things could get awkward. If you are very concerned about keeping the layers stacked, you can build your tiers around a central pole, using a dowel or empty towel/gift wrap roll. Personally, I think it’s easier for the new parents if they can unstack the cake without having to deal with a stabilizing pole, but if you’re going high and you’re worried about it toppling in transit, you may want to try this.
For a shorter cake, you can simply cut a couple lengths of tulle, pass them under the bottom tier or cake board and tie at the top. It makes a cute little poof at the top for decoration.
From the top down, you can see why you want to spend some extra time making sure that outer layer of each tier is nicely spaced out and the top layer is properly centered.

The cake board is optional, but it adds a nice, finished look and also prevents the edges of the diapers from touching dirty surfaces. We all know what’s going into these eventually, but most parents like to preserve the thought of their little ones being untouched by germy germs.
Decorating the Cake:
For a short cake, especially one made with diapers with cute, vibrant designs, you don’t need much in the way of decoration. A ribbon around each tier adds to the “real cake” look, and hides the rubber bands. Stick-on flowers are great—just make sure to avoid sticking them to the diapers.


I like to use ribbon that has wire edging. You can fold the edges of the ribbon around the rubber band (bend the corners of one cut end under so you end up with a triangle point, tucking the corners beneath the rubber band) and use the wire at the other end to secure the ribbon to itself. (Push the cut edge of the ribbon back, exposing about a quarter- to half-inch of wire; fold the edge over so you have a clean, folded edge; thread the exposed wires through the ribbon below—the wire is pretty sharp and thin, like a needle, and easy to wrap around and thread through.) If that seems too complicated, use double-sided tape or needle and thread to secure the ends, but remember: You don’t want any pins, staples, glue or tape puncturing or directly adhering to the diapers.
On a taller cake, small items can be tied on—tulle is great for this—or tucked under the edge of the tiers. Fake flowers with floral wire are great since the wires can be tucked under the tiers or between the diaper “scales” without damaging the diapers.
*Note: People who’ve seen this photo have asked about the “cake topper”—it’s a tub guard to prevent tiny heads from smacking into the metal faucet, with a hoodie towel draped over top. Return to the top


Leave a Comment