

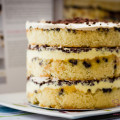
 This is the most sprinkle-tastic birthday cake you will ever encounter. I made this because we were getting together with some friends to celebrate the memory of a dear friend we lost nearly two years ago. I volunteered to make the dessert for this little dinner gathering and since it was in honor of what would have been his 67th birthday, what better than an outrageous birthday cake?
Enter the Momofuku Milk Bar cookbook again.
Chef Christina Tosi created this layer cake to replicate her favorite Funfetti boxed cake mix, but from scratch. It’s weird because it’s so artificial, and yet it’s made completely from scratch. This is the kind of strangeness that I thought our friend would have gotten a kick out of. Also, it goes perfectly with “hats and hooters,” accessories he thought were essential to an office birthday celebration.
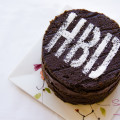
And because I knew dinner included a couple guys who weren’t dessert fiends—and I didn’t think one cake would be enough to serve all the guests—I made a second cake, my Bourbon Chocolate Smoked-Tea Layer Cake, which is made in the Momofuku layer cake style as well.

I don’t know many people who could get two birthday cakes out of me. So, cheers to you, John. Thank you for sharing your delicious life with us!
Reminder: Cooking From the Book posts are meant to be companions to the original recipe, not a substitute. As long as the book is still in print, I won’t be copying the recipe here for you. See here for why.
 © 2013 Sugar + Shake")
Before You Start (Regarding Ingredients)
I’ve mentioned in previous posts that the recipes in Momofuku Milk Bar require ingredients that aren’t exactly common in everyday home kitchens. The assortment of things I didn’t have for this recipe (and you probably don’t either):

Grapeseed oil — Not hard to find, just something that isn’t necessarily in a regular person’s kitchen. See my notes in the Momofuku Chocolate Chip Layer Cake post.
Cake Flour — Same as above. Do NOT substitute homemade cake flour. Just go buy a box.
Corn Syrup — Same as above. (But no notes from the last cake because the Chocolate Chip cake doesn’t use it. This one is supposed to mimic the taste of boxed Funfetti cake so it uses quite a few ingredients that you’d find listed on the side of a box mix.)
Vegetable Shortening — Same as above. Another “fakey” ingredient that helps duplicate the taste and texture of boxed cake.
Glucose — (In the unlabeled container.) See my notes from the Momofuku Corn Flake Cookies.
Clear Vanilla Extract — You’ll need to buy this online or go to a specialty shop for it. I happened to find a jumbo bottle at, of all places, the Bryce Canyon Lodge gift shop. I thought it was $5 (and therefore a huge steal), but it turns out that was the price for the smaller bottle. Oh well. This was still a good price ($10). It also happens to have a higher alcohol content than any of the beer that was available in the gift shop. It has this crazy store-bought cake smell. (Who else feels compelled to lick the spoon after measuring out vanilla? You’ll really have a hard time resisting this one.)
Citric Acid— According to the Momofuku Milk Bar cookbook, you can sometimes find this at the regular grocery store in the spice aisle as “sour salt.” Not in Hawai‘i you can’t. At least, not in the (three) stores I went to. I found some at Executive Chef, a specialty cooking shop, which is really where I should have started in the first place. (They seem to always have the random stuff I need for making things from this book.) You only need “a pinch” for this recipe so you’ll have to decide if you want to invest in a bottle (it’s only a few dollars) or substitute lemon or lime juice, which is an acceptable, though not thoroughly recommended, replacement. It does get used in other Milk Bar recipes so if you plan on baking a lot from this cookbook, go for it.
Buttermilk — This absolutely isn’t a hard-to-get ingredient, but I’m listing it here at the end because, as you may notice, it’s not in the photo. This is one of the few items on the ingredient list that you really can substitute for with no trouble. See my notes in the Momofuku Chocolate Chip Layer Cake post for how to substitute.
Special tools: 6-inch round cake pan and quarter-sheet pan. (“Special” in the sense that if you generally only bake cookies, you probably don’t have this stuff. Easily found at specialty kitchenware shops or online.) Also, acetate sheets. (See my notes from the Momofuku Chocolate Chip Layer Cake.)

The Process
Like the Chocolate Chip Layer Cake, this Birthday Layer Cake involves four sub-recipes: the Birthday Cake itself, Birthday Cake Soak, Birthday Cake Crumb and Birthday Cake Frosting.
Here’s the order in which I suggest making the components:
- Crumb
- Cakes
- Frosting
- Soak
This way, you can leave the oven on after you’re done with the crumb (you just have to raise the temp for the cake). By the time you’re done making the cake batter and have it in the oven, the crumbs are cool and ready to be put away, so your cooling rack is ready for the cake. While you’re baking the cake, you can also get started on the frosting. You can either use the frosting right away, or you can refrigerate it—just give it a good whipping with a whisk or fork to make it spreadable again.

You can also make the frosting further in advance, at your convenience, because you can refrigerate it. Apparently, it’s more forgiving than the Coffee Frosting for the Chocolate Chip Layer Cake, which cannot be refrigerated. I highly recommend doubling the frosting (or at least a 1.5 times batch). I went on a lunch run after doing the baking and making the frosting since the cake wasn’t cooled enough to assemble. While I was out, a friend on Instagram commented that he’d also made the cake recently.


“Did you have enough frosting?” I asked him. “It looks like it’s not enough…”
He replied that he wanted to make it again because he’d had to spread the frosting pretty thin in order to have enough. (This was also the case when I made the Chocolate Chip Layer Cake. You really don’t have to double, but if you want the thick frosting layers that are shown in my photos and in the book, you will need to make more frosting. Taste-wise, you probably won’t be missing much because the whole thing is plenty sweet already.) Doubling the recipe means you end up with about a cup’s worth of extra frosting. I used some of it for making cake truffles with the leftover cake scraps. I’m not sure what will happen to the rest, but it’s entirely possible it’ll be eaten off a spoon. Don’t judge.
Making the crumb and the cake are easy, but as I mentioned, doing this cake in the right order is key. The first time I made the Chocolate Chip Layer Cake, it took me a full day. I’ve since gotten faster at the process, having made it a few more times as well as my twist on the Momofuku-style layer cakes, my Chocolate Bourbon Smoked-Tea Cake. I’m now able to knock out the cake/crumb/frosting in roughly three to four hours, including the baking time.


Since you can’t hurry the physics of cake cooling, it’s still a most-of-the-day project, though. You can’t assemble the layers until the cake is cool. (Chef Tosi does say you can put the cake into the freezer or fridge to cool down faster, but I don’t like putting warm things in there with all the frozen/cold stuff.) You also need to let the cake set up in the freezer overnight. I actually didn’t do this; I brought it to the party after only a couple hours of freezing. It didn’t hurt anything, but it was more difficult to cut and serve (the layers wanted to slide apart).

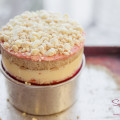
To get three layers out of a relatively small sheet of cake, you need to be a little creative. You can get two full, pretty rounds. The third is cobbled together from scrap, like so:

As you can see, it’s two full circle and two “halves.” They aren’t quite halves, though, so you need to fill in the gap in the center with more scrap. Be gentle when removing the full rounds so you have as much solid cake scrap as possible to use for fill.

Check out my post on the Chocolate Chip Layer Cake for more tips on assembling the layers and spreading the frosting. This frosting is more spreadable than the Coffee Frosting, so it’s a bit easier to work with.

The biggest/best pointer I have to give you regarding the recipes in the Momofuku Milk Bar cookbook is: Be Patient. I am NOT very patient and am very much the type to blast the mixer for a bit and say, “Yeah, that’s good.” But it’s not. It’s very important for these recipes that you keep mixing so the ingredients are fully incorporated. It is also key to duplicating the textures that Chef Tosi intended that you run the mixer as long (or as little) as she says. The book is very good about telling you how the batter should look at a given step. Don’t forget to stop the mixer and get down in the bottom with a spatula to make sure all the stuff at the bottom of the bowl is really mixed in. I notice if I don’t do that, there’s usually a small pile of unmixed flour hiding at the very bottom.
The book says to build the cake on a sheet pan and transfer the whole thing to the freezer. I don’t do this. We just don’t have the space. I just build the cake on the counter and then wrap the whole thing in plastic wrap (generous layers) and another layer of foil.
The Results
Layer cakes are just impressive looking. If you can master this, you can really be the star of the potluck party while (honestly) modestly saying, “Oh, it’s no big deal.” I really like these Momofuku cakes because they look good even when they’re assembled rather rusticly. They don’t have to be perfect. Which makes them perfect for me.

This cake is a total sugar rush. No one could finish their entire slice (although, we had two cakes and everyone had a slice of both…), but everyone agreed that it was like eating the best boxed cake ever. I pronounced it the most artificial 100%-made-from-scratch thing ever to come out of my kitchen. It had a strange balance, though. The most off-putting thing about store-bought cake to me is that both the cake and the frosting are tooth-achingly sweet. (And this coming from a sugar junkie.) Tosi’s frosting recipe uses cream cheese and that elusive citric acid to add a tang to it. That little acidic bite does a lot to balance out the sugar.

The Verdict
Should I try this recipe? If you have patience and a full day to work on it. Don’t forget that you ought to freeze it overnight as well. I think it’s less challenging than the Chocolate Chip Layer Cake because the Birthday Cake Frosting is easier to make than the Coffee Frosting (you don’t have to incorporate liquid into fat) and you skip the whole Liliko‘i Curd thing, which adds a lot more time to the preparation.
Difficulty: 3.5 out of 5
Should I buy the book? If you’re making this cake, you probably already have, haven’t you? Read the Chocolate Chip Layer Cake post for a more detailed explanation. The short answer: If recipes with multiple sub-recipes and complex assembly don’t turn you off, this book has a lot of fun desserts. Once you’ve made a few, you’re pretty well-equipped with all the weird stuff you need, so it’s sort of a Mobius strip where you keep making more recipes because you already have the stuff.
Momofuku Milk Bar
by Christina Tosi, foreword by David Chang
Retail List Price: $35.00
256 pages, hardcover
Clarkson Potter (October 2011)
ISBN: 978-0307720498
There's Always More to Eat and Drink:
 Cooking From the Book: Chocolate Chip Layer Cake (Momofuku Milk Bar)
 (Sort Of) Cooking From the Book: Strawberry-Lemon Layer Cake (Christina Tosi recipe in Saveur)
 Cooking From the Book: Cake Truffles (Momofuku Milk Bar)
 Cooking From the Book: Cereal Milk Ice Cream and Corn Cookies (Momofuku Milk Bar)
 Happy Bourbon Day (Cake)!

Lisa
July 17, 2018 3:17 pmWhat size was your “quarter sheet pan”? I’ve read online that these are typically 9 x 13 but that Christina Tosi (and Momofuku) use 10 x 15. How tall was your pan? I was going to use either a jelly roll pan or a 9 x 13. Thanks!
sugar
July 20, 2018 10:11 amHi Lisa, thanks for reading! I actually talked about the differences in “quarter-sheet” pans in a later cake post: https://sugarandshake.com/cbtb-strawberry-lemon-layer-cake/ There seems to be some variance in size, but not too much. A jelly roll pan would be great — the lip is the right height. In the middle stages of baking, your cake might puff up above the rim, but it’ll settle back down. (This happened to me just last week; I doubled the recipe to make a bigger cake and used a half-sheet pan, and the cake rose alarmingly high, but it turned out just fine.) It doesn’t really seem to matter how big your pan is, as long as it’s about an inch high and big enough so you can cut out the appropriate number of layers. If you use a smaller pan, you just get thicker cake layers (and might need to bake a little longer). Hope this helps!