

 When I took one of these mini cakes in to Shake’s office to share with his co-workers, one of them asked me, “What inspired you to make these?” I was sort of stumped. I’d come across a stunningly beautiful photo on Pinterest that led me to the base recipe, but I’d already put it off ‘til “someday” for at least a month, so I’m really not sure what possessed me to go all bakery shop this particular weekend. I don’t usually make cakes, so it really was a departure from the norm for me. I even had to go out and buy an offset spatula because I’d never owned one before!
I think Shake would have preferred I try out the ice cream maker he got me for Valentine’s Day, and which I have yet to open, but he enjoyed the cakes too. And the homemade maraschino cherries that I made to go in the cake! Ice cream next time, babe. I swear. And you can have a cherry on top.

So, as I said, I came across this beautiful photo (© Heather Baird) from SprinkleBakes of her Cherry Vanilla Layer Cake. The photo was gorgeous, and therefore inspiring, but what really got me thinking about this cake was the fact that she had spent the time to develop a recipe that didn’t start with a box mix. Her recipe called for jarred maraschino cherries, which, since she’d taken so much time to develop a from-scratch cake, struck me as…not a cop-out by any means, but just that she could have gone that one extra step further to use real maraschino cherries. I really admire her dedication to making all the rest of it from scratch. Plus, the woman’s just got skills—look how beautiful that cake and photo are!
Now, don’t get me wrong: I’m actually not against jarred maraschino cherries. I truly love them. I have managed to get nearly all of my male friends trained to hand over the cherry from their drinks (for some reason, it’s always the “manly” drinks that have cherries) any time the bartender plops one of these puppies in. I’ve also been known to eat them for breakfast.*
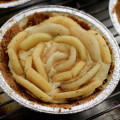
You can buy real maraschino cherries, which is, of course, dead easy. (We have a jar of the Luxardo ones, and they’re quite yummy.) Or, you could do what I did: rehydrate dried cherries in maraschino liqueur. (Recipe at the end of this post.) While writing this, I thought I’d see how other people made their own maraschino cherries, and I have to say — I’m really glad I didn’t look before I made them. There are endless debates over whether the Luxardo cherries are worth the price and all kinds of recipes, most of which are way more complicated than what I did.
 and after (right) soaking for about 24 hours. They aren’t super-plump, but they did swell up quite a bit. With booze. © 2012 Sugar + Shake")
My cherries are incredibly boozy (not surprising, since they’re entirely rehydrated with liquor) and mildly sweet. They don’t get round and plump, but it doesn’t really matter, unless you really wanted to use them for garnish (in which case, several of those multitudinous recipes will tell you how to use regular, fresh cherries). You may be reluctant to use up so much maraschino liqueur for this purpose, but you can always reuse the liquid that doesn’t soak into the cherries for cocktails later. I used some of it for the cake batter; it ends up kind of syrupy, probably because of the sugars from the cherries.
 © 2012 Sugar + Shake") I also substituted out the bottled maraschino cherry juice that SprinkleBakes’ recipe called for, instead using Morello Cherry Juice (found it at Williams-Sonoma…of course…addicted to shopping there? Me? No…) and some of the maraschino liqueur that the cherries had been soaking in.
I also substituted out the bottled maraschino cherry juice that SprinkleBakes’ recipe called for, instead using Morello Cherry Juice (found it at Williams-Sonoma…of course…addicted to shopping there? Me? No…) and some of the maraschino liqueur that the cherries had been soaking in.
The other change I made to the SprinkleBakes recipes was the frosting. Vanilla Swiss Meringue Buttercream Frosting sounds dreamy, but it called for clear vanilla extract (which I don’t have and haven’t the foggiest clue where to find) and also for A POUND OF BUTTER. A pound!! I have worked with chefs, poked around in professional kitchens and laughed when a demo audience audibly gasped in horror at a chef dropping a pound of butter into a pot of clams—I’m fully aware that butter makes things taste sooooo good, and that you’re eating way more of it than you probably think you are if you eat out at all. I am by no means deluded about the awesomeness of butter. But I kind of had to draw the line at a pound of butter for just the frosting on a smallish cake. (For those of you who read this just for the food photos, to put that in perspective, a pound of butter is four sticks. Which is an entire box of butter.) Eep! Damn, I bet that frosting tastes gooood, though!
Instead, I decided that I didn’t have enough booze in my baking yet, and turned to the Baked Explorations cookbook. (They’re big fans of boozing up their baked goods too.) One of their cakes had a tasty-sounding Burnt Caramel Rum Frosting, so I opted for that.
In my head, the latte-brown of the frosting and the pink batter went together so nicely. I had dreams of a pretty little layer cake, just like the SprinkleBakes one, but in khaki and rose petal pink hues.
Feh.
First, I had ridiculous amounts of trouble finding a 7” spring-form pan. When I located some, they turned out to be $40 each. Holy crapoli! Instead, I bought four 4.5-inchers and figured, well, I’ll just make two miniature layer cakes—totally cute!
Feh.
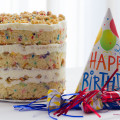
 Also thwarting my little dream layer cake plan: I over-filled my mini spring-forms and when I peeked into the oven, I saw that I had four little muffin domes coming up. This was not going to be conducive to layer cake-ing. Shake thought I should cut off the domes (I’d already thought of this before I showed him, in anguish, my little cake igloos), because that way he could eat the muffin tops. But I didn’t want to “waste” all that cake. So once again, my cakes multiplied. From one layer cake to two mini layer cakes, I went to four mini dome cakes. I had a feeling I shoulda bought six pans instead of four.
I said earlier, cakes are really not my thing. I am realizing why.
Not only did my cake structuring not go as plan, I didn’t manifest the colors of my dreams either.

The batter started out a beautiful pale pink. Great, I thought. SprinkleBakes achieved the lovely pink in her cake by using food coloring. I wasn’t excited about that idea, and was really hoping that the cherry juice would do the trick since it looked so vivid.
 Yeah. Not so much. Once the whipped egg whites were added into the batter and the cakes baked, I ended up with a weird purplish color. Kind of like taro bread. Gross.
One of the eight kizillion recipes I found for maraschino cherries suggested adding hibiscus tea to give the cherries a more vivid red stain, so next time I might try a little hibiscus syrup. Or, maybe I’ll just go with the artificial coloring.
The frosting did turn out the color I expected, but I am not very adept at frosting, so my cakes did not turn out to be the prettiest confections ever. They were still yummy. The cake was moist, and there were plenty of boozy cherry bits. The frosting was a bit sweet and rich, but the cake was dense and not overly sweet on its own, so it worked well with the frosting. Finally, something went the way I thought it would! And, I have to say, of all the things that could go wrong, I’d say that getting the right taste is the most important thing…

Homemade Maraschino Cherries
Technically, you really only need half of this recipe to make the cake. However, you will start snacking on these, and sooner or later, you’ll find yourself passed out on the floor, having eaten all your cake cherries.** Just make the extra, you’ll thank me later.
- 2 cups dried cherries (I used tart Montmorency cherries, because that’s what I had on hand, because that’s what happens when you buy a 2-lb. bag from Costco to make cookies. You end up with a pound of cherries floating around the kitchen cabinet.)
- 1 ½ cups maraschino liqueur
Combine cherries and liqueur in a glass jar. Allow to soak for at least 18 – 24 hours, if not longer. The longer you soak…the more boozed up they get. They will not, however, rehydrate completely back to full size, so don’t expect them to ever get round. They’ll keep practically forever, as long as you keep the liqueur covering the cherries. When you’re done eating the cherries, you can use the leftover syrup for cocktails or baking.
Maraschino Cherry Cake
Adapted from SprinkleBakes
If you would like little domes like mine, use four 4.5” spring-form pans. If you would prefer miniature layer cakes, you’ll probably need six pans (and will need to go easy on the frosting). Otherwise, use two 7” spring-form pans for a larger layer cake, or one 9” for just one big ol’ regular cake.
I used Morello cherry juice in this recipe. There are others that you can find at grocery stores—just make sure you get 100% juice, not those Ocean Spray “juice cocktail drink” things)
- ½ cup unsalted butter
- 1 ¼ cups granulated sugar
- 2 cups all-purpose flour
- 1 tablespoon baking powder
- ¼ teaspoon salt
- ¼ cup whole milk
- 2 tablespoons maraschino soaking liquid (from homemade maraschino cherries, above)
- Cherry juice — combine with the maraschino liqueur to make ½ cup
- 2 teaspoons almond extract
- 2 tablespoons flour for sprinkling over diced cherries
- 1 heaping cup homemade maraschino cherries, chopped
- 4 egg whites, beaten to stiff peaks
Preheat oven to 340˚ and grease the pans.
Cream butter and sugar together in the bowl of a stand mixer. In a separate bowl, whisk together flour, salt and baking powder. Combine milk, maraschino liqueur, cherry juice and almond extract, and add alternately to the butter and sugar with the flour mixture.
In a small bowl, sprinkle the 2 tablespoons of flour over the diced cherries and stir until the flour has been completely absorbed.
Stir cherries into the batter. (At this point, if you would like your cakes to be pretty and pink, add a couple drops of red food coloring.)
Fold stiffly beaten egg whites into the batter. Pour into prepared cake pans and bake for 50-60 minutes, or until a toothpick stuck into the top comes out clean. Cool on a wire rack.
Burnt Caramel Rum Frosting
From the Baked Explorations cookbook
I don’t normally provide recipes when I haven’t altered them and they’re readily available from their original source. However, since this one ultimately involves halving part of the original recipe and it would be a real pain in the ass if I gave you only half of this cake, I’m going to copy it here. But I highly recommend this cookbook with all of its wonderful recipes.
To Make the Burnt Sugar Liquid
I have already re-portioned this recipe so it will make the amount of frosting you need; the original uses some of this liquid for a cake! Mmmm!
- ¼ cup granulated sugar
- ¼ cup heavy cream
- Approximately 3/8 cup coconut milk
- 4 teaspoons fresh lemon juice
In a medium saucepan over medium heat, slowly melt the sugar. Use a wooden spoon to stir it continuously to ensure even melting. When the sugar turns a dark caramel color, remove the pan from the heat and slowly stream in the cream while continuing to stir. (Do it realllly slowly, otherwise it’ll hiss at you and you’ll end up with a giant lump of caramel stuck to your spoon. Guess how I know. But if this happens, it’s OK.) Return the pan to medium heat and stir until completely combined; cook for 2 minutes longer, stirring. Transfer the burnt caramel mixture to a heatproof liquid measuring cup (like Pyrex) and add enough coconut milk to make just over a half cup of liquid. Add the lemon juice. Whisk to combine, set aside.
To Make the Frosting
- 1/2 cup (1 stick) unsalted butter
- 2 tablespoons dark rum
- 2 1⁄3 cups confectioners’ sugar
- Burnt Sugar Liquid (see above)
Put the butter, rum, confectioners’ sugar, and burnt sugar liquid in a food processor. Pulse in short bursts until the frosting is shiny and smooth. If it seems thinner than you’d like, add more sugar a tablespoon at a time.
With the cakes on a wire rack (be sure to spread some paper underneath), carefully pour or ladle frosting on the tops of the cake domes and allow to ooze downward. Use an offset spatula to help spread the frosting and cover the sides. Let the frosting set before serving.
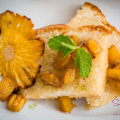
Caramel Shard Topping
This caramel shard decoration is entirely optional—but it’s very pretty.
Put ¼ cup granulated sugar in a small saucepan. Add enough water—about ½ teaspoon—to make it the texture of wet sand. Cook on high heat until the sugar turns amber. Pour the caramel onto a Silpat (or other silicone nonstick) baking mat.
Let cool. Break the cooled caramel into small shards and use them to decorate the frosted cake.

*True story. On more than one occasion, I had them for breakfast in elementary school. Please don’t judge my mother too harshly. I’m sure she felt that the fact that I was consuming something was better than nothing. Return
**Not a true story, but don’t you think it could totally happen? Return
![]()

Melissa Chang
May 26, 2012 1:35 amFEH????
sugar
May 26, 2012 11:44 amYes, “Feh.” Far more concise than, “Bah, humbug, crap, crap, crap…urrrgghhhh!!!!” 😉