

 The Baked NYC cookbook Baked Explorations is a favorite of mine, so I was thrilled when Shake gave me the two other books in the collection about a year ago. (There’s now a fourth, released this past fall.) I’ve made a couple other recipes from them before. I know that it’s not a terribly good idea to make things you’ve never made before when you’re cooking/baking for other people, but I keep pushing my luck and doing it. Partly because our friends tend to be pretty accepting of my using them as guinea pigs, and partly because it mostly works out OK in the end. Nothing yet has sucked so hard that it was deemed a failure. (Cross fingers, knock on wood.)
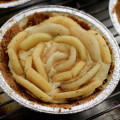
So when we were invited to the home of our friends, the Qs, for a dinner party, I decided to make the Baked Elements Chocolate Whiskey Tart. (I considered the Whiskey Pear Tart, my go-to standby from the Explorations book, but decided I wanted to try something new instead.) I knew we’d most likely be ending the night with some bourbon, so I searched for something that would complement the liquor. The Elements cookbook is perfect for that since it devotes a chapter each to several different ingredients commonly used in baking, one of them being “Booze.”
Reminder: Cooking From the Book posts are meant to be companions to the original recipe, not a substitute. As long as the book is still in print, I won’t be copying the recipe here for you. See here for why.
Before You Start (Regarding Ingredients)
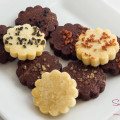
As with the other Baked NYC recipes that I’ve tried my hand at—though I’m not saying this is true entirely across the board for all their books—there aren’t any ingredients that are outlandishly difficult to find. You may need to visit a gourmet shop if you want to get some really good quality chocolate, but no crazy wild goose chases here. (And these days, many regular stores have a specialty section where you can get the good stuff.) We shop at Whole Foods and they are fantastic at stocking local products, which means that there was plenty of excellent Hawaiian chocolate to be had, including these baking bars.
This is as weird as this recipe gets:

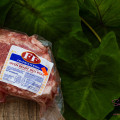
For the booze, I selected from Shake’s copious stash, a bottle of Elmer T. Lee. He was out fetching us lunch, so I had hoped to find something good that was already open so I didn’t need to call him to have a discussion about why I wanted to use his “good stuff” to “just” bake with, but no luck. The only open bottles were the really high-end stuff, which I wouldn’t dream of using, and my usual baking hooch, Maker’s Mark. There’s nothing wrong with Maker’s, but I actually did have a reason for choosing good ol’ Elmer (if you look closely, you can make out his picture there at the back of the bottle), which I was able to articulate to Shake when I called to ask if I could open the bottle. (Phew.) I picked Mr. Lee because I remembered that when I tasted it, my first thought was that it would be excellent with dessert. There was a lingering sweetness and flavor that I felt would complement the dark chocolate and buttery shortbread.

The Process
And, OK, here’s where I confess that although Cooking From the Book posts are supposedly ones in which I steadfastly refuse to deviate from the published recipe…I made a couple alterations. But not by much, I swear!
Both changes were to the shortbread crust. First, I used Macadamia Nut Shortbread (from Punalu‘u Bake Shop) instead of regular, because we had two boxes on hand that we’d been given as a gift. I don’t even think that should count as a deviation, but I will freely admit that it wasn’t specifically called for in the recipe.
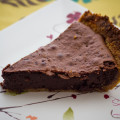
I also strayed from the path in the amount of shortbread I used. The two boxes amounted to 12 ounces between them (6 ounces each). The recipe called for 8 ounces. So I pulverized (more on this shortly) a full box, studied the pile of crumbs and decided that 1) it was ridiculous to pretend that anyone would ever eat the remaining 4 ounces of cookies if I left them in the box and 2) the pile looked kind of pathetic and no one in the history of the world has ever complained about too much cookie crust. So I blitzed the entire second box into crumbly oblivion, too. (If you do this, you’ll be multiplying the crust recipe by 1.5 times; don’t change the chocolate filling.) Incidentally, the recipe does indicate that the 8 ounces of shortbread is meant to produce about 1.75 cups of crumb. I was dubious that I would have that much after adding in only 2 ounces from the second box. I think I ended up with just over 2 cups worth by using both boxes. When comparing my tart to the photo in the book (see the end of this post), it’s obvious that my crust is much thicker. But, like I said, when does anyone complain about too much cookie crust?

So, here’s the deal with the shortbread: it’s extremely buttery. I highly recommend that you crush it into crumbs using some kind of manual method—a rolling pin, or your bare hands alone (the cookies are soft and crumbly enough that they’ll give easily). I used my beloved Magic Bullet (I was too lazy for the bigger food processor) and I ended up with shortbread butter beneath the blades and along the edge of the jar. Perhaps a real food processor wouldn’t do this, but in my opinion, it’s not worth the time to haul it out and clean it after when shortbread crumbles so easily. (I am sure that the macadamia nuts did not help this situation, but I don’t think I can assign the blame entirely to the nuts.)
There are a few other things you should know about the shortbread crust. First, don’t forget that after you’re done pressing the crumb mixture into the pan, you need to pop it into the freezer for a bit. (There’s no explanation of why, but I’m guessing that it’s an attempt to chill out the goopy butter.) I did forget, so it was in the oven for about 40 seconds before I realized that I’d passed right over that step.
Second, also because of that high butter content, you need to make sure to set the pan on a baking sheet. (This is also in the instructions, and it’s very important unless you want a really messy oven.) I did not overlook this step, but I’m pointing it out because it’s one of those things that you might easily miss or think, “Eh, that’s just an extra dish to wash!” The butter absolutely will ooze out of this sucker during both baking phases.

Finally, once you’ve pre-baked the crust, when you pull it out, you may notice that the crumbs have puffed up and the upper edges of the sides of your crust are now alarmingly close to the “bottom” of the crust layer. (I say “may” because it happened to me, but I’ve only done this once so I don’t know for sure that it always happens.) I think this is also a butter-related issue, so yeah, if you are butter-phobic, you probably shouldn’t be baking in the first place and definitely want to avoid this recipe. Use a spoon (be careful not to burn your knuckles; I only did about three times) to gently tamp down the bottom and carefully nudge the sides up, if needed. The filling will make a layer about a half-inch deep, so you need more than that to keep it contained. I’m not sure if the crust would’ve settled back down or not, but I wasn’t going to take a chance. (Sorry, I was feeling a little irritated by the crust at this point, so I did not take a photo of this situation.) I really could have done more up-nudging since the book’s photo shows a much thinner crust, but I was concerned about it being too thin and burning.
The recipes in the Baked NYC series are generally pretty simple—it’s why I like them. However, I will say that they do not provide the same level of detail in their instructions as, say, Christina Tosi’s Momofuku Milk Bar. (Soooo looking forward to her new book!) Perhaps more complex recipes by their very nature make their authors (or editors) feel compelled to add more instruction. Ironically, that makes the simpler Baked recipes harder to follow if you don’t cook very often.
For example, Baked Elements says to “lightly beat the egg, egg yolk, flour and whiskey” in a small bowl. It does not tell you whether you should start out by dumping all these ingredients into the bowl at once, or if you should add them in a particular order, much less what it should look like when you stop. Knowing what happens when you dump flour into egg willy nilly, I knew that the best way to come out with a reasonably smooth mixture was to beat the eggs first, gently sprinkle the flour over (do NOT just dump it in a lump), mix that in and then add the whiskey. It’s not totally necessary, especially if you’re using an electric mixer (I didn’t—hauling it out for two eggs didn’t seem warranted) but it’ll take a lot more effort to get the flour to mix in completely and not leave floury clumps scattered throughout. I think it’s really gross when you bite into something batter-y and discover a raw dusting of flour because it wasn’t completely mixed in.

I would also suggest a few taps of the pan against the counter and smoothing out the filling to get rid of air bubbles, which aren’t directed in the recipe, but it’s not the end of the world if you don’t. I was irritated that the surface of the tart had bubbles, but I should have known that would happen since I didn’t bother to get rid of them before baking. Laaaaaazy! (Not that it matters a ton when you’re going to dump whipped cream all over, anyway. So I guess my laziness was justified.)
The photo in the book shows the whole tart topped with the Whiskey Whipped Cream, but I felt like that would be a crazy mess to deal with when portioning, so I put dollops of boozed up cream on each individual slice when I served. The recipe calls for 1 to 2 tablespoons of whiskey; 2 will yield a cream that people decide they want to eat more than the tart. Just so you know.
Oh, and be sure to make the cream just before serving. The booze really does contribute to the cream losing its stability relatively quickly. (You can whip it up again, of course, but it’s never quite the same.)
The Results
This recipe yielded a dense, rich, fudgy tart. Not too sweet, though, due to the blend of milk and dark chocolate and no additional sugar. The Baked Elements Whiskey Chocolate Tart was very similar to Christina Tosi’s Momofuku Milk Bar Brownie Pie—cookie crust, chocolate filling. (In fact, if you look at my final photo in the Brownie Pie post, the crust looks more like the Whiskey Chocolate Tart should have, but you can also see why I feared that the crust might burn if I pressed it too thin and far up the sides.)
Note that the filling and crust have separated in this photo because I was attempting to separate the tart from the bottom of the pan and it was having none of that. You shouldn’t see any big cracks like this when you’re done baking.

When I asked Shake which he liked better, he said he liked the Momofuku Graham cracker crust better (I keep saying it’s the best ever!) but preferred the filling from the Baked NYC chocolate tart, and not just because of the whiskey in it. I have to say I agree with him.
The Baked tart has more chocolate and cream, but no (additional, beyond what’s already in the chocolate) sugar and less butter. It also has substantially less flour, and is therefore less cake-like and more like fudge. The Momofuku pie is definitely of a brownie consistency, albeit an intentionally underbaked brownie, as opposed to a solidified chocolate pudding like the whiskey tart.
To be perfectly honest, I think the shortbread crust is more trouble than it’s worth—the whole having to freeze the pan before putting it in the oven is just a pain-in-the-ass step and one that I can’t always take. I happened to make this recipe at a time while I’m attempting to clean out the freezer in order to have room to store my nephew’s first birthday cake, so there was ample room. Otherwise, extra space in our freezer just isn’t something that exists. (Plus, like I said, I’m not a big shortbread fan.) I would make this again, but I’d swap the crust for Tosi’s Graham Cracker version.

I’d definitely keep that Whiskey Whipped Cream, though!
The Verdict
Should I try this recipe? The filling is definitely worth a go and the whiskey cream is a delight. Depending on your freezer space and feelings on shortbread, I’d suggest swapping the crust.
Difficulty: 2.5 out of 5 (It’s not difficult, per se, but I feel the crust just makes things more complicated than they need to be.)
Should I buy the book? If you have a decent baking foundation (enough so you have a sense of how batters should look or how you should combine ingredients together—in other words, when you think, “Does this look right?” you feel fairly confident that yeah, that’s probably the way it goes) and you have a penchant for the ingredients to which the chapters are devoted: Peanut Butter; Lemon & Lime; Caramel; Booze (whiskey, really); Pumpkin; Malted Milk Powder; Cinnamon; Cheese; Chocolate; and Banana. If you aren’t excited by at least half of those, and/or you really need detailed directions to feel comfortable, you probably want to skip it.
Baked Elements: Our 10 Favorite Ingredients
by Matt Lewis and Renato Poliafito
Retail List Price: $32.50
224 pages, hardcover
Stewart, Tabori and Chang (September 2012)
ISBN: 978-1584799856
Leave a Comment