

 This past weekend, we had two dinners to go to for which I was responsible for dessert. Actually, I volunteered for dessert duty since I figured that I could make something in a double batch and simplify my life. Mission sort-of accomplished.
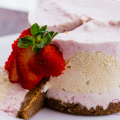
As much as we love our local, small batch, artisanal food products, we have to admit that Costco does have a place in our lives. Such as those moments when you need a three-pound block of cream cheese for $10. And four pounds of strawberries for $6. What does one do with all of this? Make cheesecake. Two cheesecakes.
So here’s the deal: I basically followed a Martha Stewart Living recipe for strawberry cheesecake. (Yes, Martha, again. I didn’t make enough changes to the recipe to warrant rewriting it and posting it, so find it here.) However, the recipe calls for one pound plus 13 ounces of cream cheese for one cake; a 3-lb. block does not divide evenly into that amount, and I really didn’t feel like buying either a second 3-lb. block (what on earth would we do with it?!) nor another pound on its own for the same price as the giant Costco block. I’m cheap that way. So I shorted the cream cheese for each cake by about 1/3 lb. It didn’t hurt anything, but the cakes were not as high as the Martha photos. Not necessarily a bad thing, considering that cheesecake is pretty rich. Also, for some reason, the recipe online says one pound of strawberries, whereas the printed recipe from the actual magazine calls for a pound and a half.
This cheesecake gets a wonderful flavor boost by roasting the strawberries first. So that means I had to remove the tops of three pounds of strawberries. Fun. But…check this out:

Can’t claim to have come up with this idea; saw it on Pinterest (originally a Glamour tip). Clever, ‘eh? It definitely made things speedier in the prep.
 At both dinners, everyone said the crust was awesome. It’s nothing special, but you gotta love a graham cracker crust on a cheesecake! (Though, I have to say, I probably prefer an Oreo crust more…) Here’s another note regarding the recipe: It calls for four sheets of graham cracker to make a cup and a half of crumbs. The “sheets” in the box I bought—and this may be the same for you—were small. I used an entire package (8 sheets) to make enough crumbs to make a good crust. I find most people feel there’s no such thing as too much crust on a cheesecake.
By the way, that lovely little gadget behind the crackers is my adored Magic Bullet. Yes, the same one you see on infomercials. I thought it was silly too, but a friend of ours who is the executive chef of quite a fancy hotel told us that he had one and he loved it. The man owns EIGHT blenders, and his fancy hotel could get him whatever spiffy kitchen gadget he wanted, so when he said it was his favorite blender to use at home, we figured he knew what he was talking about. He did. It’s awesome. So much better than hauling out the food processor or blender (it has both kinds of blades), and especially for us, since there’s just two of us and I often need just a little bit of something chopped up or blended.

Martha, because she’s Martha, wants you to make this cheesecake pretty and layer a “plain vanilla” layer on top of the strawberry layer. I didn’t reserve enough of the cream cheese mixture before adding in the strawberries, plus my frosting technique flat out sucks, so instead of layers, I went with an attempt at an artistic “flower” swirl in the center. Into the oven it goes.

And out of the oven.

OK, so maybe you’re wondering why that vanilla swirly center bit seems to have expanded during cooking….well, that’s because these are two different cakes. I was running way behind schedule on the first cake, so we had to scoot off to dinner almost as soon as it came out of the oven. I didn’t even have a chance to get it into the fridge to cool, much less take photos. It’s really advisable to a) let the cake cool completely and b) chill for a very long time (4 hours minimum, but it would be MUCH better overnight). Neither of mine had a chance to really cool and chill enough, so the centers were not nearly as firm as they should have been.

I garnished early on the second cake, just so I could snap something in the gorgeous afternoon sunlight before we hit the road for Sunday dinner at my parents’. Since it hadn’t really cooled, the strawberries sort of sank into the top. I’m not terribly proud of these photos; the lighting in my mother’s kitchen is not so great, I didn’t bring pretty plating props, and the pan didn’t release cleanly (not to mention the aforementioned not-quite-solid issue). But I wanted to show you how the layers turned out.


As always, check out the gallery for larger versions. And since I can’t end with non-pretty photos, here are some in keeping with the “strawberries and cream” theme:


My mom had bought cherry blossom branches, so I took a couple photos. I’m not sure where these came from; the flowers are much larger and paler than the cherry blossoms I’d seen on the Big Island. I guess the flowers look different, depending where they grow?


Leave a Comment