

This is not a typical Cooking From the Book post for a bunch of reasons (the recipe’s not from a book; I absolutely did not even try to follow the procedure exactly as written) but because I thought it deserved a very thorough walk-through, I’m calling it a (Sort Of) Cooking From the Book.
In June, a post from Saveur showed up in my Facebook feed:
It’s Strawberry Lemonade Momofuku cake season!
Posted by SAVEUR Magazine on Wednesday, June 24, 2015
Ooh, yummy, right?
Because I’m the kind of crazy who serves things to people that I’ve never tried making before, I decided I’d make this for dessert for our annual Fourth of July fireworks-viewing party. I’ve made Christina Tosi’s Momfuku Milk Bar layer cakes several times (from her cookbook of the same name), so I actually had a lot of the “odd” ingredients in the recipe already, and I knew roughly how big a project I was committing to.
This cake, though, called for several extra steps. It’s definitely the most difficult (time-consuming) of her recipes I’ve ever attempted. It’s a whole-weekend (or several weeknights) project, for sure. The good news is that it’s very multi-day prep friendly (you can refrigerate or freeze almost all the components). The bad news is that the recipe, as published, is not easy to follow. In order to ensure I wouldn’t add something I shouldn’t, I drew myself lines…and even a picture so I could count up all the crazy layers.

Sorry, Saveur, I love you guys, but this was obnoxiously hard to read. Therefore, in addition to annotating the process, I’ve re-written the recipe for anyone who might want to take a stab at making this cake themselves. (Note: I have never had any trouble following the recipes in Momofuku Milk Bar. They are very well-written and the sub-recipes for each component are clearly broken out.) Another reason I was annoyed by the recipe presentation was because they changed some of the methodology that those who have used the Momofuku Milk Bar cookbook are used to. It’s a minor gripe, and I think it was done in an attempt to use materials that “regular” home cooks might more readily have, but if you’re gonna Tosi it up in your kitchen, you might as well do it the way she does in her book, right?
Update: So, just as I’m finishing writing this, I went back to the Saveur post and discovered that the way it’s displayed on their website has now changed. It is no longer the baffling, incredibly long version that I got when I printed out the recipe. I don’t know when they changed it—obviously sometime between the end of June and now. I still find it annoying because you can’t see all the sub-recipes on the same page—you have to click between them.)
Before You Start (Regarding Ingredients)
If you’ve made other recipes by Christina Tosi before, this one only has one thing that you probably don’t have: pectin. (It’s for the Pickled Strawberry Jam.)
 © 2015 Sugar + Shake")
What the heck is pectin? How is it different from gelatin (which is easy to find and already needed for another part of this recipe)? Basically, the difference boils down to three things: 1) Pectin is a carb and gelatin is a protein; 2) Pectin is plant-based and gelatin comes from animals; 3) Gelatin needs to be chilled to set, while pectin needs to be heated. The two both come in powder form and aren’t entirely interchangeable, though it seems that you probably can substitute gelatin for pectin, but pectin for gelatin is more problematic. (Pectin needs certain things—namely sugar and acid—in order to gel, while gelatin is more flexible in use.) If you’re a super-nerd and you’re dying to know all the nitty gritty about pectin, this blog post was super informative.
 and regular white sugar. © 2015 Sugar + Shake")
But I didn’t have time to research it before making the recipe, so I went out and bought some. (If I’d done the research, I think I would’ve taken my chances and tried using gelatin, especially if it had taken me more than two stores to find it.) I usually get my “weird stuff” from Executive Chef, but they didn’t have any. I was a little surprised by that; I knew you need it for jam, and it totally seemed like the kind of place to have it. But so did Whole Foods, and that hunch paid out. (Unlike the times when I looked for freeze-dried corn and liliko‘i purée there. Go figure.) The brand WF had was Pomona, and it’s praised around the ‘net as an excellent one for jams. It did have a packet tucked in there to make calcium water, which puzzled me and I waffled on whether or not I really needed it. “Meh,” I said—since the recipe clearly said pectin and didn’t mention calcium. (I should really “Tweet with Tosi” and get a definitive answer on this.)
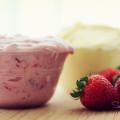
I don’t know if it’s because I really needed the calcium water or if it’s just because pectin (especially this brand) is known to firm up more than gelatin (or maybe I measured wrong), but my jam came out pretty thick. It didn’t jiggle or run at all. It was spreadable, however. But since I made it a week ahead and the fridge made it even more firmly set, I did zap it for 15 seconds in the microwave before using it on the cake.
It’s not that expensive, and the Pomona brand can supposedly be kept for a long time, so you might as well get some. I think that it would turn out OK if you substituted gelatin, perhaps a little runnier, but I can’t promise anything. And now that I have a box, I’ll probably never find out…
As far as other things you may not have on hand, but can easily obtain: grapeseed oil, buttermilk, dry milk powder and citric acid. You’ll also need some acetate to build the cake up—the Saveur recipe directed the use of parchment, but Tosi’s book says acetate, which is much sturdier, plus it’s see-through, so it looks nicer. (See here for my citric acid notes, here for milk powder and here for everything else.)
I also used Maui Preserved vanilla powder for the cake. That’s my own little touch; you don’t have to do it (I’ve noted the amount of regular vanilla extract to use if you go that route), but I just love the marshmallow smell and taste of this stuff. You can buy it online (here’s another source) or at farmers markets, and I also see it in stores all over the state where they stock local gourmet food products (R. Field and Whole Foods among them).
Finally, a note about the vinegars for the Pickled Strawberry Jam. The recipe calls for a little bit of sherry vinegar and a little bit of white wine vinegar. If you’re a salad dressing freak, maybe you have both. I don’t, and I suspect most normal folks don’t either. If you have Champagne vinegar, that’s a nice substitute—replace both vinegars with that and call it a day. (That’s what I did.) Personally, I think balsamic has a really assertive and distinctive taste, so I would choose to substitute with red wine vinegar over balsamic, but it’s not gonna kill ya if that’s what you’ve got. Honestly, one of our guests asked, “So…what’s the ‘Pickled’ part about? I don’t taste anything pickled.” Even when we tasted the jam on its own, it wasn’t terribly “pickled.” So don’t stress about your vinegars. Just don’t use plain white vinegar.
The Process
This was the most complicated dessert recipe I’ve ever tackled. Like the other Tosi recipes, it’s not that it’s HARD to do (it doesn’t call for any weird techniques or super-special kitchen equipment); it’s just time consuming and requires, ugh, patience and organization.
 © 2015 Sugar + Shake") As with the other layer cakes, there’s an ideal order to tackle this one in:
As with the other layer cakes, there’s an ideal order to tackle this one in:
- Pickled Strawberry Jam / Lemon Curd (you can do these two in either order)
- Vanilla Cake
- Cheesecake
- Milk Crumb
- Pickled Strawberry Frosting
Of course, this is not the order the original recipe was written in, so there was a great deal of flipping back and forth between pages and hoping I didn’t accidentally make a meat trifle. Go ahead and make the jam and curd up to a week ahead. Cake can be made a few days ahead. I didn’t have much trouble making the cake, cheesecake, crumbs and frosting all in the same day—but it did take most of the day (not continuously, but you’ve got to eat sometime). You can also make the cheesecake ahead of time (the original recipe says it’ll keep a week in the fridge), but it is under-baked, in case you feel weird about that. I suggest making the crumbs and the frosting just before you assemble the whole cake together. Because of what they’re made of (powdered milk and white chocolate), the crumbs can get sticky or lose their crunch. You could make the frosting ahead of time, but then you’d have to bring it back down to room temp (slowly—no nuking) in order to make it spreadable, so I don’t see the point in that.
Making the Strawberry Jam and the Lemon Curd is very easy and straightforward.


We just got a new Vitamix blender (LITERALLY, we bought it with pennies…and nickels, quarters and dimes; spare change adds up, yo) and I was fascinated by the “hot friction soup” function, which can also make—dun da dun!—curd! So I did it. You don’t have to (I have normal-people instructions in the recipe below), but it’s amusing. And it saves you from washing an extra pot and sieve (and having to wash out the blender in between steps). But it’s not much faster. Otherwise, the process for making the Lemon Curd is pretty much the same as making the Liliko‘i Curd in the Chocolate Chip Layer Cake. (See my post for some notes on handling the gelatin, if you’ve never done it before.)
The jam’s quite simple, no surprises there. Neither recipe makes extra—it’s all used up in assembling the cake—so if you think you want toast goodies for another day, double the recipes.
Making the Vanilla Cake is also easy.
 © 2015 Sugar + Shake")
OK, here’s another place where Saveur changed the recipe from the version I printed out and saved in my Evernote. The version I saved says 7-inch by 11-inch jelly-roll pan. The version they have up now says to use an 8-inch by 12-inch pan. Momofuku Milk Bar directs use of a “quarter-sheet pan” for its layer cake recipes. But that just goes to show you: It doesn’t really matter what size pan you use, as long as it’s approximately this size, since, know what? Quarter-sheets vary anyway. Some are 8×12 and some are 9×13. I just bought a new one and wondered why it seemed bigger than the one I already had. There ya go.
 No matter what pan you use (I use the shallow, true sheet pan type, but I know some people just use regular baking pans, and that’s fine if you really don’t want to get a new pan), make sure you grease it well AND use parchment on the bottom. Although the style of cake is forgiving and lets you get away with a generous number of imperfections, what can’t be helped is if your cake gets stuck inside the pan.
Another of my nitpicks on the Saveur recipe is that they call for “vegetable oil” here when all of the Momofuku Milk Bar recipes I’ve seen specify grapeseed oil. Grapeseed oil is vegetable oil, so I can only assume they used the more generic term to be friendlier to home cooks. If you’ve got grapeseed, use it. If you don’t, but you plan on making more Milk Bar recipes, go get some. Do not use olive oil.
Oddly, I had fewer cake scraps left than I usually do, but this cake is much spongier than the Chocolate Chip or the Birthday Cake, so I think I just crammed more cake in to fill the gap. (See my Birthday Cake post for notes on how to cut out the rounds and cobble together the bottom layer from scraps. It has better photos.)

I pulled the cake out after 25 minutes because the top was starting to get pretty well-browned. The bottom ended up slightly under-baked—just a little; so little that the skewer I put in came out totally clean. Not the end of the world, but you can go for the extra three minutes the recipe directed. You can always trim off the browned top, if you’re feeling really picky.
This cake is also more delicate to handle than the others I’ve made. It’s more prone to breaking as you move the cut-out circles around, so use a big spatula and be really careful. (If it does break, don’t cry—just piece it together and cover up any failings with filling or frosting. No one will know.)
I was a little weirded out by the cheesecake directions. You’re asked to line a six-inch cake pan with plastic wrap and then bake the batter in that plastic wrap-lined pan. Of course, this goes against everything Mom ever told you about putting plastic in the oven. I was very skeptical and worried about the plastic wrap melting. (This Food52 post says restaurant-grade wrap won’t melt.) I inspected the box of plastic wrap (generic Costco Kirkland brand) and didn’t see anything about ovens. No “NO OVENS, GODDAMMIT!” and no “This is totes fine for the oven!” Hmmmm…

As you can see, I went for it. (The wrap said “BPA-free” so that somewhat assuaged my fears that some weird chemical would leach into the cake. Somewhat. This Modernist Cuisine post says it’s chemically safe.) It is not easy to line a cake pan with plastic wrap. The non-stickness of the pan means the wrap doesn’t want to cling to the inside walls. Figure it out. (Cut the wrap bigger than you think you need—it’s easier to trim than to desperately try to cling to an edge of the wrap hoping it won’t drop down below the batter level at any point during the filling or baking process. Guess how I know?) Next time, I’m going to use a rubber band to hold the wrap in place while I dump the batter in.
The thing with the cheesecake is that you want it to stay as pale as possible—it should be just barely set on the top (which means it’s under-baked in the center). The original recipe said to bake for 20 minutes; at 20, my cheesecake was still extremely runny in the center. I checked on it every five minutes after that, all the way to 40 minutes. You want to see a skin form over the top, but when you shake the pan, you should see it move. If the top still looks shiny and there’s no dull, crusty skin, keep going. (I believe the purpose of the wrap is to prevent the heat of the pan from browning the edges of the cake.) The edges should also start to pull away from the walls a little bit. If they start to brown, take it out.

If you’re making the cheesecake the same day as you assemble the entire cake, once the cheesecake cools, you can combine it with the lemon curd. There’s almost no way you’re getting the cheesecake out nicely in one piece (so the plastic wrap is handy for this, too)—just flop it out into a big bowl. It doesn’t matter how ugly it is because it’s going to be mixed up and used as filling anyway, so it’s supposed to be glop.

See, it basically looks like custard. Use a whisk to mix the lemon curd and cheesecake together and try to get out as many lumps as you can. (I know this photo looks like I dumped it out right on that baking rack, but it’s really inside a glass bowl.)
The Milk Crumbs are the weirdest part of this recipe. As I can attest, powdered milk doesn’t taste great. These smelled weird when I mixed the batter, and they smelled even odder as they baked. I found that the mixture was really sandy and so I ended up squeezing fistfuls of it to try to get it to clump a bit more. It’s better, in my opinion, to have bigger crumbs that you can break apart after baking instead of lots of teeny ones that end up baking faster (and turning darker).
The texture after they’re baked is also strange—they’re powdery, but also hard and crunchy. They taste not-that-great when you eat them alone, even after they’ve been bathed in white chocolate.

Speaking of white chocolate, the original recipe doesn’t tell you how to melt it. (I know, melting things is not hard, but I evaluate recipes from the standpoint of someone who doesn’t know how to cook—I started out not knowing a damn thing, and I appreciated recipes, and still do, that spell out exactly what to do.) You can melt the chocolate on the stove top (in a double-boiler or an approximation of one, if you’re feeling fancy). Or, you can nuke it in a glass bowl on low heat for about 10 seconds. Depending on whether you’re using one giant chunk or several of those small baking bar pieces, you might need more or less time. If you use the microwave, make sure to actually prod the chocolate with a spatula when checking for doneness; don’t just look at it—the center melts first, while the outer layer looks like a shell. The center can get hot enough to melt the outer parts if mixed together well. If you’re just waiting for the whole thing to collapse and melt, you could burn the outside while the center turns into chocolate lava. And then you’ll have to start all over again. If you’re nervous, use the stove. It takes longer, and you have to pay attention, but you’ll know exactly when the melting starts.

Nothing special about making the frosting, except that this is where you need the citric acid, which is one of the strange things that you end up buying if you make a lot of Milk Bar recipes. I do recommend making the frosting just before you assemble the cake. Then it’s nice and spreadable.
The assembly process is standard for this style of cake—just keep stacking everything. I get confused easily, so I drew myself a little picture of the cake so that I could mentally process how many layers of each thing are involved. (For the record, it’s two lemon juice soak, three cake, two jam, two lemon curd-cheesecake, three crumbles and one frosting.)
Contrary to what the jam photo below shows, I do find it easier to put a smallish splotch of filling in the center, and then dollop the rest along the outer edge of the layer—because of the acetate collar, it’s easier to spread inward or side-to-side than it is to go outward. If you have a big pile in the center, you may end up with a hump; a divot is easier to hide, whereas a little hill in the center pushes up and can make your layers slope downward at the edges. Doesn’t always happen, but can.
 © 2015 Sugar + Shake")

The curd-cheesecake mix is pretty runny. It also ends up being quite a bit of filling, so be generous with your two layers. You can also be pretty generous with your crumbs. I tried to save the bigger ones for the top, and sprinkled the smaller ones in between the layers, for cosmetic reasons.
This is a good shot of the six-inch pan that I use to make these. It’s the same one you’ll see in all my layer cake posts, and it’s the same one I used to make the cheesecake in. If you’re a one-panner like me, make sure you leave enough time between making the components and final assembly that the pan has time to cool down between uses.
. © 2015 Sugar + Shake")
The most important thing to remember is that no matter how many days you spread your component-making over, you need at least 12 hours of chill-time in the freezer before you can serve this beast. After that, depending on your feelings on frozen cake, you need time for it to defrost. The recipe directs three hours. (Tosi says similar in the cookbook.) I like frozen cake (hooray for ice cream cake!) so I just let it sit for 30 minutes or so—enough that I’m able to cut through all nine zillion layers. Don’t let it sit too long (“too long” really depends on your home’s temperature) because while soft is easier to cut, and the flavors do come out better when it’s not so cold, if it gets too warm, the soft filling layers will cause everything to slide apart when you apply the pressure needed to drive the knife down through the whole cake. (I once served the Birthday Cake after only a few hours in the freezer, and the layers kept slipping while I tried to cut.)
The Results
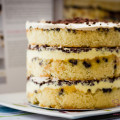
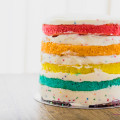
Well, it sure is purty!
. © 2015 Sugar + Shake")
It has a very nice, fresh, tart taste from the strawberry jam, and the lemon curd-cheesecake layers aren’t overly sweet. Definitely a great summertime dessert. (Of course, there’s lots of baking that has to go on, so that just makes the house hotter in an already over-heated time of the month. So that part’s not so summer-fun.)
The Milk Crumbs did not taste as off-putting as I feared they might. When I served the cake, I told all our guests that they needed to be completely honest with me about their feelings on the crumbs. If they thought they were weird or gross, I wanted to know so that I could use some other kind of crumb the next time. Everyone agreed that while they wouldn’t eat the crumbs alone, they were good in the cake. It kind of lends a Nesquick Strawberry Powder kind of taste. But not as sweet. (But then, what is?!)
The Verdict
Should I try this recipe? If you’re not daunted by two-day recipes, yes! On the Saveur Facebook post I saw people grumbling that they thought the recipe looked too complicated and not worth it. Well, I don’t know how they expect it to be any less complicated. It’s got a zillion different layers of stuff! If you wanted to be lazy about it, you could skip the cheesecake part and just layer with lemon curd (it would be MUCH more intense—the cheesecake helps to mellow out the lemon). Or, you could divide the curd-cheesecake mixture into thirds instead of halving it, use it as the top frosting layer and skip making the frosting. Blend it with some jam, or not. These are all hypothetical suggestions; I haven’t tried any. Honestly, if you want a spectacular looking and tasting cake, you’re just going to have to do some work. I’ve re-written the recipe to be closer to the way that they’re organized in the Momofuku Milk Bar cookbook, which I find very easy to follow. It still takes time, but the beauty of it is that you can do one component every day and it’ll work out nicely.
Difficulty: 4.5 out of 5 (Not gonna lie—this isn’t something you can whip up in a couple of hours. If you follow the directions, you’ll be fine, but there are a lot of places where you can go wrong—making the jam, baking the cheesecake just the right amount, melting the chocolate.)
Should I buy the book? This recipe came off Saveur’s website, so there’s no book to buy. Saveur’s a great food magazine, though, and I learn a lot from it. (Plus they’re always writing about cool new products, both food and gear.) The recipes are a mixed bag, but they do a lot of travel pieces and explore regional food, which is interesting, even if I’ll never make the dishes. I think it’s worth subscribing to, even if it is a pricier magazine. Good writing and photography don’t come cheap, you know. Of course, the recipe is Christina Tosi’s, of Momofuku Milk Bar fame, and it’s emblematic of the type of creations she makes. Her Momofuku Milk Bar cookbook is excellent if you are willing to put in the time to make multi-step desserts. Most of them involve at least two components. The directions are very easy to follow and give good reference points for how what you’re working on should look at a particular step. If you think this cake is the coolest thing ever and you’re not scared off by the process, the book is definitely for you.
Momofuku Milk Bar
by Christina Tosi, foreword by David Chang
Retail List Price: $35.00
256 pages, hardcover
Clarkson Potter (October 2011)
ISBN: 978-0307720498
And, as promised, here is my version of the recipe:
Strawberry Lemon Layer Cake
Adapted from Christina Tosi’s recipe, as published on Saveur.com
Set aside at least two days (one to make all the components and assemble the cake, and one for freezing) to make this cake. You can also do one or two components a day for several days; most components will keep up to a week in the fridge before assembly. I highly recommend making the items in the order they appear in this recipe, and also suggest you make the Milk Crumbs and Strawberry Frosting just before you assemble the cake. Read the (Sort of) Cooking From the Book post on the blog for detailed instructions and advice on this recipe.
Special equipment: Quarter-sheet baking pan; six-inch round cake pan with removable bottom (either the type with the disk that sits freely in the bottom, or a springform); acetate (cut into two strips each 3- to 4-inches wide by 18- to 24-inches long)
There are six components to this recipe:
- Pickled Strawberry Jam
- Lemon Curd
- Vanilla Cake
- Cheesecake
- Milk Crumb
- Pickled Strawberry Frosting
For the Pickled Strawberry Jam:
- 12 oz. strawberries, hulled
- 1 cup sugar
- 2 teaspoons pectin
- ½ teaspoon kosher salt
- 2 teaspoons sherry wine vinegar*
- 1½ teaspoons white wine vinegar*
*If you don’t have sherry vinegar, you can substitute Champagne vinegar for both types of vinegar. Other alternatives for sherry vinegar are red wine, rice or balsamic vinegar. (In this case, substitute only for the sherry vinegar.)
Purée strawberries until smooth. In a small saucepan, combine sugar, pectin and salt; whisk together. Add the strawberry purée into the saucepan along with both vinegars. Stir to combine. Bring to a boil over high heat, and then reduce the heat to medium-low. Cook the jam, stirring continuously, until it thickens and looks a bit shiny, about 10 minutes. Remove from heat and let cool completely. Jam can be stored in the refrigerator for up to 2 weeks. Bring to room temperature before using.
For the Lemon Curd:
- 6 tablespoons sugar
- 5 tablespoons fresh lemon juice*
- Finely grated zest from 2 lemons*
- 3 large eggs
- 2¼ teaspoons unflavored powdered gelatin
- 6 tablespoons chilled unsalted butter, cut into ½-inch cubes
- ½ teaspoon kosher salt
Use a blender to combine the sugar, lemon juice and zest until the sugar dissolves, about 30 seconds. Add eggs and blend on low speed until smooth and foamy, about 15 seconds. Transfer the mixture into a small saucepan and clean out the blender. Sprinkle the gelatin powder over 2 tablespoons cold water and let stand for 5 minutes. Heat the curd over low, stirring continuously with a wooden spoon or a spatula, until thickened and bubbles begin to break the surface. The curd should form a thick coat over your stirring utensil. Pour the lemon curd into the clean blender along with the softened gelatin, butter and salt. Purée until smooth. Scrape the curd through a fine sieve into a bowl, allow to cool and refrigerate until the curd is completely chilled, at least 1 hour. Curd can be stored in the refrigerator for up to 1 week. Bring to room temperature before using, to make it easier to mix.
Alternative Vitamix prep: (Do not attempt this in a standard blender; it will not be capable of bringing the mixture to a high enough temperature. Consult manufacturer’s instructions to determine if your high-speed blender can be used to make friction-heat recipes.) Add sugar, lemon juice and zest, eggs and salt to the blender. Use the “Friction Soup” program setting, and start the blender (or start on Speed 1 and gradually bring it up to Speed 10, letting it run at top speed for 5 minutes). While it runs, prepare gelatin as per instructions above. Set blender to Speed 5 and remove the lid plug. (Be careful, the contents are steaming hot.) Add butter carefully, one piece at a time, through the lid hole (there may be some splashing), covering the hole between additions. Add gelatin. Replace lid plug, increase to Speed 10 and run for 30 seconds. Transfer to a clean container and allow to cool before storing.
*After zesting, juice both lemons. This should give you about the 5 tablespoons you need for the curd. If there’s any left, save it, as you’ll need additional lemon juice for the final cake assembly.
For the Vanilla Cake:
- Nonstick baking spray
- 8 tbsp. unsalted butter, softened
- 1¼ cups sugar
- ¼ cup packed light brown sugar
- 1 teaspoon Maui Preserved vanilla powder (or 1 tablespoon vanilla extract)
- 3 large eggs
- ½ cup buttermilk
- ½ cup grapeseed oil
- 1½ cups cake flour
- 1 teaspoon baking powder
- 1 teaspoon kosher salt
Pre-heat the oven to 350°. Cut a sheet of parchment paper to fit the bottom of a quarter-sheet baking pan. Spray the sides and bottom of the pan with nonstick baking spray and lay the parchment in.
In the bowl of a stand mixer fitted with the paddle, cream the butter, sugars and vanilla powder (if you are using extract, you will add it later) on medium-high speed for 3 minutes. Scrape down the sides of the bowl, add eggs, and continue mixing on medium-high speed for 3 minutes. Combine buttermilk, oil and (if using) vanilla extract in a measuring cup with a pouring spout. (It’s not necessary to mix them together.) Reduce the mixer speed to low, and slowly drizzle in the mixture. Increase the mixer speed to medium-high, and beat until the batter doubles in volume and turns very pale, about 6 minutes.
Reduce the mixer speed to low, add the flour, baking powder and salt, and mix until just combined. Pour the batter into the parchment-lined pan and smooth out the top. Bake until a toothpick inserted in the middle of the cake comes out clean, 28 to 30 minutes. (Check on it at around 25 minutes, in case your oven runs hot.) Transfer to a wire rack and let cool completely. If you’re making the cake ahead of time, wrap the pan in plastic wrap and refrigerate for up to 5 days.
Otherwise, prepare the cake as follows for assembly: Place a large cutting board on top of the cake. Flip the cake pan and board over to turn the cake out onto the board. If it doesn’t come out cleanly when you try to lift the pan, flip the whole thing over again and remove the board. Run a plastic spatula along the edge of the pan to loosen the cake. Repeat the flip-over process.
Use the bottom insert of the 6-inch round cake pan as a guide to cut out two full circles and two almost-half circles. Set aside. (Do not discard scraps; you will need them to fill in the gap between the partial circles in order to make a full layer.)
For the Cheesecake:
- ½ teaspoon cornstarch
- ½ teaspoon kosher salt
- 2 tablespoons whole milk
- 1 large egg
- 8 ounces cream cheese, softened
- ¾ cup sugar
Pre-heat oven to 300° and line a 6-inch round cake pan with plastic wrap. (Cut the wrap bigger than you think you need; you can always trim it up.) In a small bowl, whisk together cornstarch and salt. Add milk and egg, and whisk until smooth. Add cream cheese to the bowl of a stand mixer fitted with the whisk attachment, and beat for 2 minutes, until smooth and fluffy. Scrape the sides down, and add the sugar; continue mixing 2 minutes more. (The batter should look light and fluffy.) Scrape the sides down, add the cornstarch mixture, and run for another 3 minutes. Scrape the sides down and mix for another 30 seconds to 1 minute. At this point, the batter should look smooth (no lumps) and runny. Pour the batter into the prepared pan and bake until set at the edges, but still loose in the center. (When you shake the pan, the center should wobble.) Check after 20 minutes and every 5 minutes after that (up to about 40 minutes). The surface should appear dull, not shiny. Do not allow cheesecake to brown. Transfer to a rack and let cool completely. Cheesecake can be stored in the refrigerator for up to 1 week.
When you are ready to assemble the layer cake, turn the cheesecake out into a large bowl. Don’t worry about keeping it intact; it doesn’t matter how ugly it looks. Add the Lemon Curd and whisk together until completely smooth.
For the Milk Crumbs:
- ¾ cup instant nonfat dry milk, divided
- ¼ cup all-purpose flour
- 2 tablespoons cornstarch
- 2 tablespoons sugar
- ½ teaspoon kosher salt
- 4 tablespoons unsalted butter, melted
- 3 ounces white chocolate, melted
Pre-heat oven to 250°. In a medium bowl, whisk ½ cup of the dry milk with the flour, cornstarch, sugar and salt. Add the butter and stir gently with a spatula until clusters form. Spread the clusters onto a parchment- or Silpat-lined baking sheet. If your clusters are very tiny (fish tank gravel-sized or smaller), squeeze them together in your fist and gently break the resulting lump into smaller pieces. Ideally, you want clusters that are about ¼- to ½-inch in diameter. Bake until the crumbs are dry to the touch, about 20 minutes. Don’t let them get too browned. Transfer the pan to a rack and let cool completely.
Pour the crumbs into a bowl and break apart any that are larger than ½-inch in diameter. Toss with the remaining ¼ cup dry milk until evenly coated. Pour the white chocolate over the crumbs and mix gently with a spatula until evenly coated. Toss the crumbs every 5 minutes until the chocolate is cooled completely and no longer sticky. Crumbs can be stored in a clean container in the refrigerator for up to 5 days, but it’s best to make them the same day as you assemble the cake.
For the Pickled Strawberry Frosting:
- 5 tablespoons Pickled Strawberry Jam
(see above; you don’t need to make extra, simply take 5 tablespoons out) - 8 tablespoons unsalted butter
- ¼ cup confectioners’ sugar
- 1⁄8 teaspoon citric acid
- ¼ teaspoon kosher salt
In the bowl of a stand mixer fitted with the paddle, cream butter and sugar on medium-high speed until pale and fluffy. This takes 3 minutes; don’t stop early. Meanwhile, in a small bowl, mix the Pickled Strawberry Jam with the salt and citric acid. Add the jam to the mixer and beat on low speed for 1 minute, until smooth and fluffy.
To assemble the cake:
- 1½ teaspoons fresh lemon juice
Line a 6-inch removable-bottom cake pan with a strip of acetate. Trim or secure ends with tape, as needed. Lay the two semi-circles of cake in the bottom of the pan. Use cake scraps to fill in the center gap between the two larger pieces, trimming off any hard edges. (See blog post for photo.) Using a pastry brush to apply evenly, thoroughly soak cake with lemon juice (use ½ of the juice), then use an offset spatula (wipe it clean between uses) to spread half the Pickled Strawberry Jam over the cake. Sprinkle with ⅓ of the Milk Crumbs. (This is a good place to use the smaller-sized crumbs; reserve the biggest crumbs for the top.) Press gently into the jam to secure.
Spoon half the Lemon Curd-Cheesecake over the Milk Crumbs and smooth out the surface with the offset spatula. Gently place one of the full-circle cake layers (the less-pretty of the two) over the cheesecake layer. Press down gently and check that it’s level. Brush the cake with the remaining lemon juice. At this point, your stack has probably reached the top of your acetate strip. Carefully tuck the second strip between the first and the inside of the pan. Trim and secure with tape as needed. Repeat layering process with the remaining jam, half of the remaining milk crumbs and all of the remaining curd-cheesecake mix.
Place the remaining cake layer (this should be the nicest one!) on top of the cheesecake, press gently and check that it’s level. Spread the Pickled Strawberry Frosting over the cake and smooth with the offset spatula. Sprinkle with the remaining Milk Crumbs. Carefully wrap cake with plastic wrap; be careful not to pull too tightly across the top—the acetate strips should remain perfectly circular, or your cake won’t come out with nice round edges. Freeze the assembled cake for at least 12 hours to set the layers. Make sure that nothing is pressing against the sides of the cake, as any pressure will also skew the cake’s final form. Cake can be stored in the freezer until ready to serve, up to 2 weeks.
When ready to serve, remove the cake from the pan. If using a non-springform removable bottom pan, you may want some help to slide the pan down around your wrist (like a big bangle bracelet) as you push the cake up and out from the bottom. The cake is pretty solid when it’s frozen, so you can turn it on its side to help slip the pan off. Peel away and discard the acetate, separate cake from the pan bottom and transfer to a serving plate or cake stand. Allow 30 minutes to 3 hours to defrost before slicing and serving. (Length of time depends on your feelings on eating frozen cake; Sugar + Shake prefer it closer to frozen because it’s more like an ice cream cake. If your filling layers soften too much, you may have a difficult time cutting through the cake, as the cake layers will slide.) Cake can be cut into 8 to 12 slices.
![]()

Sandy
December 31, 2015 5:37 amThis cake rocks! Thanks for all your helpful tips. Here are my tips:
1. Used 3, 8inch pans for the cake and it turned out beautifully. One layer was baked in the springform pan and became the base layer. Cake was still 5inches tall.
2. Couldn’t find the acetate to support the sides so purchased the flexible cutting boards at the dollar store and cut it into strips. It wasn’t clear but worked like a charm.
3. Doubled the jam. I needed extra as I also doubled the icing to have extra to pipe a border around the top.
4. Used gelatin in the jam. Needed a bit more than the pectin but worked like a charm.
Definitely a 2-day project but each step is relatively straight forward. The end result is truly impressive.
sugar
January 13, 2016 10:26 pmHey, those are some clever ideas! Never would have thought about using those flexi cutting boards — so economical and you can reuse them, too!
Karla
December 5, 2016 4:27 amOh wow I just finished making the cake (12 hours!!!) for my birthday. This recipe was super easy to follow, and the cake looks bomb even if I goofed up a couple of times. Thank you Sugar+Shake for holding the hands of us novice bakers. Hearts to all!
sugar
December 5, 2016 8:09 amThank you and congratulations! (Happy Birthday, too!) I promise, it gets easier every time you make it (or the other MMB layer cakes).
Ruth
February 11, 2017 11:38 amThanks for the wonderful instructions. what a beautiful cake! I haven’t quite finished making it yet (I’m still on the first day) but I really appreciate how well written and organized your directions are. Also, for the cheesecake, to prevent the plasticwrap from falling in while filling the pan, I lightly dampened the sides of the pan. That helped the plastic wrap to stay in place while I was filling the pan.
sugar
February 12, 2017 11:07 amThat is such a genius idea! I’m glad you found this post helpful!
Becca
May 26, 2017 5:57 amThank you for posting this! I am obsessed with the Milk Bar cookbook and your tips here are super helpful. I made this cake last year from the Saveur recipe and also remember it being more involved than any of the layer cakes in the book. Because I’m a glutton for punishment I decided to make it again, and am so glad I found your site! Beautiful pictures, too.
One other tip about the liquid cheesecake – I’ve always made it in a Pyrex loaf size pan. The cling wrap sticks beautifully to the glass! You may need to cook it 5 min longer than you would in a metal pan, but what’s 5 minutes in a 2-day recipe?
sugar
May 26, 2017 1:12 pmThank you so much for your feedback! I’m so glad I did this post because I am getting so many good tips in return — that’s a great idea about the cheesecake, since who cares what shape pan it’s in when it all gets dumped out anyway. Brilliant!
cate
June 17, 2018 9:18 amthis is a so great- thanks for going step by step and debunking the saveur mag recipe confusion!
i don’t have a stand mixer because I live in a city in an apartment tight on counter space. need to get one now, to make this and just because its time. i am hoping to get the kitchen aid mini stand mixer because it is smaller and will take up less space. it is 3.5QT is that enough for this recipe and in general for the MMB recipes you’ve made, assuming i don’t need to make 4 cakes at a time? or do i need the big one?
thanks again! cate
sugar
June 17, 2018 6:52 pmHi Cate, thanks for reading! To be honest, I haven’t made one of these in a while, and I can’t remember how high the level comes up on the bowl. I looked up the specs on that mini, and I have to say that since it is really not THAT much smaller as far as taking up space, I would go for the regular size version. The mini also doesn’t seem to come with the bowl cover (which you definitely need when you’re making the frosting) and it’s quite a lot less powerful.
I totally hear you on the small apartment, no counter space situation (my mixer lives on a bookshelf in another room), but this is one item I wouldn’t skimp on.
cate
June 26, 2018 3:29 amok, interesting about the bowl cover and your general thoughts. thanks so much- going for the traditional mixer now! thanks!!
Julia
October 23, 2018 2:49 amI did the combo of looking at your instructions/guides and the saveur recipe. Thanks so much for walking us through this event-of-a-cake that this is! Given your less than enthusiastic review of the crumbles, I modified and added some vanilla and lemon zest to the batch and they were pretty delightful
sugar
October 23, 2018 11:33 amSo glad this helped you! Your crumb version sounds divine! The original is not too bad when you eat a whole bite of cake, but Tosi has me hooked on munching on the crumb for snacks, so I was pretty sad that these were not stand-alone tasty. (Milk powder is just the weirdest…!)
Tom M
April 28, 2020 3:46 pmI wish I had read this all before I attempted to make the cake. I love doing complicated projects like this. I also planned over an entire weekend in preparation for her birthday on Wednesday. My experience was very different than yours. My first cheese cake turned out just fine but I do use the wrong amount of sugar so I had to trade over. That one was nice and firm but had trouble removing the plastic. And while you mention that the lemon curd in the cheesecake is very runny I had exactly the opposite problem. The lemon curd was so stiff that I had to get out an electric mixer to beat it for a while in order to combine it with the cheesecake and to make it smooth. Are used a half sheet pan to make the cake and it was nice and thick and firm and flavorful. I used to stand mixer to make the frosting as instructed but the quality of the frosting was too minimal for the stand mixer to really be effective. It came out a little bit lumpy. More lumpy than I had originally thought. I should’ve used a handmixer. The most ridiculous thing though is that what you were referring to as the revised recipe calls for a 32 inch long piece of parchment to line the 6 inch cake pan. And that the height should be about 12 inches. I really questioned that I thought a piece of acetate would be better as well. But never having made the recipe I really didn’t understand how tall the cake would be. 12 inches is ridiculous. It is not that tall. I should’ve followed my instincts but again, not having made the recipe, I didn’t want to risk it for this very special occasion. All the components separately taste fabulous. I can’t wait to try it all together. It’s in the freezer now
sugar
June 23, 2020 7:16 pmHey Tom, I’m so sorry that it’s taken me this long to approve and reply to your comment! Thanks for reading and I hope that the cake came out great and that your birthday gal enjoyed! I do like Saveur, but the way they did the recipe makes me wonder if anyone actually went along step-by-step to see if they wrote it all down correctly. I guess they thought that cutting one parchment strip was easier than doing it in two steps?! It must’ve been really hard to get the bottom of the cake built!
Wendy
August 22, 2021 9:33 amI’ve made many Milk Bar cakes and had to throw out the vanilla cake because it was very oily and sunk in the middle. When I checked my Milk Bar cookbook cake recipes determined that the proportion of oil to liquid was never equal. Thing perhaps you should adjust your recipe to 1/2 cup buttermilk and 1/3 cup of grape seed oil. I used her Brown Butter cake recipe with much better results
sugar
August 27, 2021 11:49 amSorry to hear you had trouble with the recipe. I haven’t made this in years, but I had no trouble, and it doesn’t seem like any of the other commenters on this post did either, though we all had issues with other parts of the recipe! I didn’t create it, I merely rewrote the instructions to be more streamlined than the original and helpful for home cooks, so the ingredient list is as original, per the Milk Bar instructions.